CutContour & PerfCutContour — The Spot Color Standard for Print-and-Cut Workflows
Every print-and-cut workflow has the same final problem: how does the cutter know which lines to cut and which lines to print? The industry answer, established by Roland DG in the early VersaWorks era and adopted by nearly every major RIP since, is a deceptively simple convention — name the swatch, not the color.
Why cut line spot colors matter
Designers assume that "100% Magenta" makes a cut line. It does not. A stroke painted in 100% Magenta as a process color is printed. A stroke painted in a spot color named CutContour is cut — regardless of whether that spot color is defined as magenta, cyan, lime green, or black.
The reason for this design is practical. Spot colors separate into their own plate during RIP processing. A spot named CutContour becomes its own separation, which the RIP intercepts before printing and routes to the cutter. The color value is what the designer sees on screen; the spot color name is what the RIP acts on.
Two consequences follow. First, spelling and capitalization are everything — CutContour works, cutcontour does not, Cut Contour does not. Second, the swatch type must be Spot, not Process — a CMYK-defined process color named "CutContour" will print, not cut.
The CutContour standard
CutContour is the de facto standard spot color name for through-cut (die-cut) paths in the print-and-cut industry. It originated with Roland VersaWorks and was adopted by Mimaki RasterLink, Graphtec Cutting Master, and many third-party RIPs. A path stroked with a swatch named exactly CutContour is recognized by the RIP as a cut path and removed from the printable artwork.
The four required conditions
For a stroke to be recognized as a CutContour cut line, all four conditions below must hold:
- Swatch name: Exactly
CutContour. Case-sensitive. No leading or trailing spaces. - Swatch type: Spot Color. Not Process Color.
- Applied to: Stroke, not Fill. Vector path only — raster lines (even of any thickness) are ignored.
- Overprint Stroke: Enabled (see below).
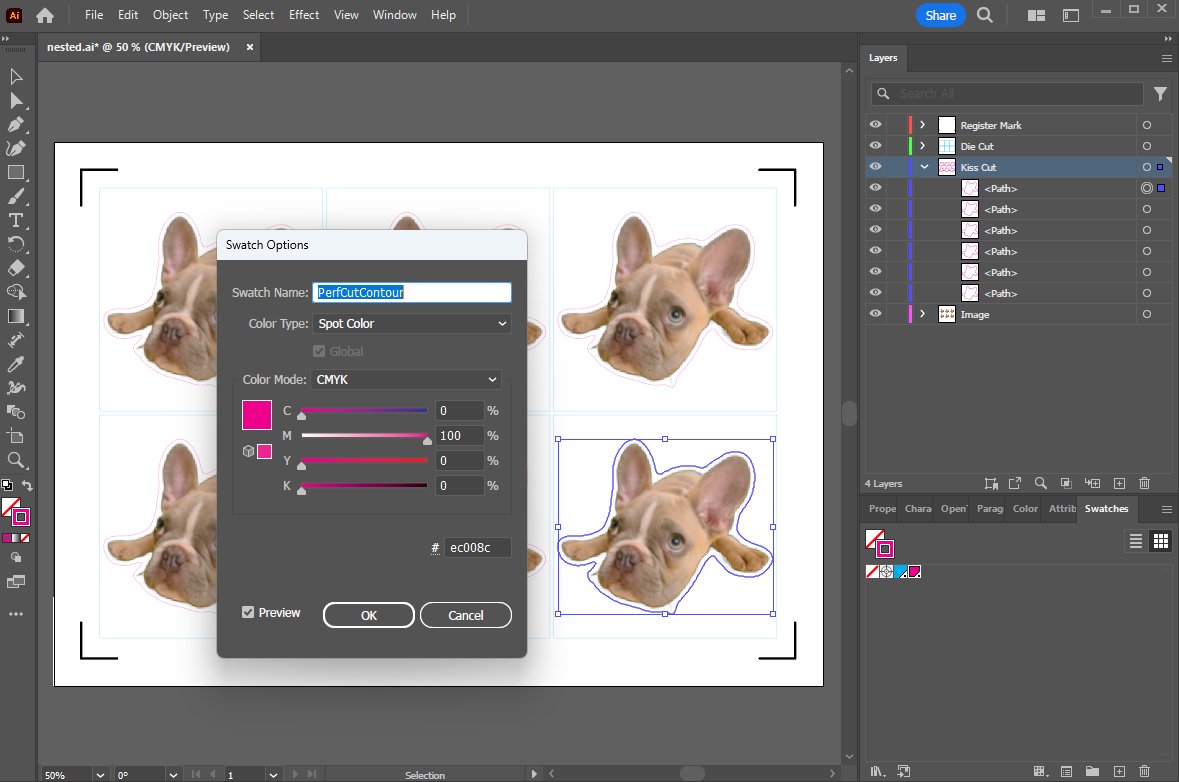
PerfCutContour registered as a Spot Color — the swatch name and the Color Type field are what the RIP reads. The display color here is magenta (#ec008c); Roland's reference swatch defines the same name as cyan. Both files cut identically on a Roland VersaWorks RIP because the recognition is by name, not by color. The Layers panel on the right shows the four-layer structure (Register Mark / Die Cut / Kiss Cut / Image) used for sticker sheets with both cut types.
The default swatch color
Roland's official VersaWorks swatch library ships with CutContour defined as 100% Magenta (CMYK 0/100/0/0). This is purely a display convention so the designer can see the cut path on screen. The RIP does not read this value.
Why Overprint Stroke is non-negotiable
Adobe Illustrator's default behavior is "knockout" — a stroke removes the artwork directly beneath it. For a cut line, this is catastrophic: every die-cut path creates a thin white gap in the printed design along the entire cut perimeter. The fix is to enable Overprint Stroke in the Attributes panel for every path using a CutContour spot color.
If a cut path uses a spot color, Overprint Stroke is on. Always. There is no use case in print-and-cut where you want the cut path to knock out artwork.
PerfCutContour and multi-cut workflows
The second standard name in the Roland convention is PerfCutContour, used for perforated cuts and kiss cuts. The naming is exact and case-sensitive in the same way CutContour is. Roland's default swatch ships with PerfCutContour defined as 100% Cyan, again for display only.
Kiss cut and die cut are mechanically different operations. A die cut goes all the way through; a kiss cut stops at the backing layer so a sticker can be peeled off without separating the carrier sheet. On Mimaki and some Roland machines, this is controlled by a "Half Cut" toggle in the cutter firmware; on others, the RIP applies different blade pressure to paths assigned to the perf spot color.
Mimaki's prefix-and-suffix extension
Mimaki RasterLink extends the Roland convention by allowing arbitrary suffixes after the CutContour prefix. According to the official RasterLink reference guide, a path stroked with a spot color named CutContourCut1 or CutContourHalf is recognized as a cut path, and each suffix can be assigned a different cutting condition (blade pressure, speed, half-cut depth) inside RasterLink.
This allows a single file to carry multiple cut types — for example, a die-cut outline plus an inner kiss-cut and a perforated tear line, each on its own spot color, each routed to its own blade setting in the RIP.
The prefix CutContour must be exact and case-sensitive. The suffix accepts single-byte alphanumeric characters only. Examples: CutContourCut1, CutContourHalf, CutContourPerf. The suffix is the user-defined identifier the RIP uses to assign cut conditions.
File structure for multi-cut jobs
Most production workflows keep each cut type on its own layer in Illustrator. Layer separation is not a RIP requirement — the RIP reads spot colors, not layers — but it makes the file readable for the designer and makes selective visibility toggling possible when generating print-only or cut-only PDFs for downstream workflows.
Cutter-by-cutter reference
The table below summarizes the cut line conventions across the three major RIPs that use the CutContour standard.
| RIP / Plugin | Die-cut name | Kiss-cut name | Default color | Notes |
|---|---|---|---|---|
| Roland VersaWorks | CutContour |
PerfCutContour |
M100 / C100 | Original standard. Swatch library installable from VersaWorks Swatch folder into Illustrator or CorelDRAW. |
| Mimaki RasterLink | CutContour |
CutContourHalf (or any suffix) |
Designer-defined | Accepts CutContour + alphanumeric suffix. Each suffix maps to a different cut condition in RasterLink. |
| Graphtec Cutting Master | CutContour (compatible) |
Layer or spot-color driven | Designer-defined | Plugin-based workflow. Cutting Master 5 reads Illustrator crop marks directly — no Graphtec-specific registration marks required. |
What this means in practice
A file built with CutContour and PerfCutContour spot colors, both set to Spot type with Overprint Stroke enabled, will be correctly recognized by Roland VersaWorks, by Mimaki RasterLink (which sees CutContour with no suffix as the default cut), and by Graphtec Cutting Master. This is the closest thing to a portable cut line file format the industry has.
Alternative naming standards
Not every cutter uses the CutContour convention. The most notable exception is the Summa F-series and roll cutters with the GoProduce RIP, which use a different naming standard.
Summa: Kiss-cut and Thru-cut
Summa's official spot color names are Kiss-cut (for half cuts) and Thru-cut (for die cuts). In GoProduce, spot color names are linked to physical tools — a spot named Kiss-cut can be assigned to the kiss-cut tool, while Thru-cut maps to the through-cut tool. The default display colors are 100% Red for one operation and 100% Blue for the other, depending on configuration.
Summa's GoSign plugin for Illustrator and CorelDRAW provides swatches with the correct Summa naming, and the GoProduce "Methods" tab maps each tool to its expected spot color name.
RIP-internal naming
Other RIPs that target multiple printer brands — Onyx, Caldera, ColorGATE — typically allow the operator to define which spot color names trigger which cutting operations. In these environments, the CutContour standard is honored by default but is not enforced.
When sending files to a print shop without knowing their RIP, the safest combination is CutContour for die-cut and PerfCutContour for kiss-cut. These names are recognized by every major RIP except Summa GoProduce. For Summa-only shops, ship a separate file with Thru-cut and Kiss-cut.
Common pitfalls
These are the five errors that cause cut paths to fail at the RIP. All are silent failures — the file opens, looks correct on screen, and prints normally, but the cut path is missing or wrong.
1. Process color instead of Spot
A swatch named CutContour defined as a Process color (CMYK or RGB) is treated as a regular printable color by the RIP. The cut path prints in magenta and the cutter receives nothing. In Illustrator's Swatch Options, the Color Type field must read Spot Color, not Process Color.
2. Spelling and case errors
cutcontour, CutContour (trailing space), Cut Contour, CUTCONTOUR — all fail. The RIP performs an exact byte-level match. Copy the swatch name from a known-good source rather than typing it manually.
3. Overprint Stroke disabled
The file cuts correctly but the print shows a thin white outline around every cut shape. This is the classic "halo" defect. In the Attributes panel for the cut path, Overprint Stroke must be checked. This is per-object and does not propagate across newly drawn paths automatically.
4. Color converted to Process during export
Some PDF export presets — and certain "Save As EPS" options in older Illustrator versions — convert spot colors to their CMYK equivalents. The cut path arrives at the RIP as 100% Magenta process color and is printed. Use PDF/X-4 for export and verify in Acrobat's Output Preview that CutContour still appears as its own separation.
5. Stroke weight set to None or Hairline
A stroke with no weight assigned, or one set to "Hairline" in software that exports it as a zero-width path, will not be picked up by all RIPs. The de facto safe value is 0.25 pt. The thickness does not affect cutting accuracy — the cutter follows the path centerline regardless — but the stroke must have a numeric weight greater than zero.
Automating the standard
The CutContour standard is a strong convention but a brittle workflow. Every cut path needs the right swatch name, the right swatch type, the right Overprint setting, and the right stroke weight. A 10-sticker batch is manageable by hand. A 200-design daily order book is where files start failing silently at the RIP.
This is the kind of task that pays back automation. The standard itself does not change — the RIP still reads CutContour the same way it always has — but the steps to produce a compliant file can be moved out of the designer's checklist and into a pipeline.
What a pipeline replaces
In the manual workflow, a designer or production operator performs the following steps for every cut-line file:
- Generate a cut path around each design (offset, simplify, clean up self-intersections).
- Apply the
CutContourswatch as a stroke, with Spot type and Overprint Stroke enabled. - For sticker-sheet jobs, generate a separate
PerfCutContourkiss-cut path. - Nest the cut shapes onto the sheet, leaving correct margins for the cutter's registration marks.
- Hand the finished file to Illustrator for final review, then export to the RIP.
Each of these steps has its own failure mode. Most of them are silent.
Pressria Bridge applies the standard automatically
Pressria Bridge is a print nesting automation app for Windows. Its pipeline accepts image or PDF input, generates the cut-line geometry, applies the CutContour and PerfCutContour spot colors according to the convention described in this article, nests the parts using a True Shape Nesting (NFP) algorithm, and opens the finished sheet directly in Adobe Illustrator for final review.
The spot color names, swatch types, and Overprint Stroke attributes are written into the output file exactly as Roland, Mimaki, and Graphtec RIPs expect them. Pressria Bridge does not invent the standard — it follows it. The user keeps full control of the file in Illustrator; the automation removes the repetitive setup, not the review step.
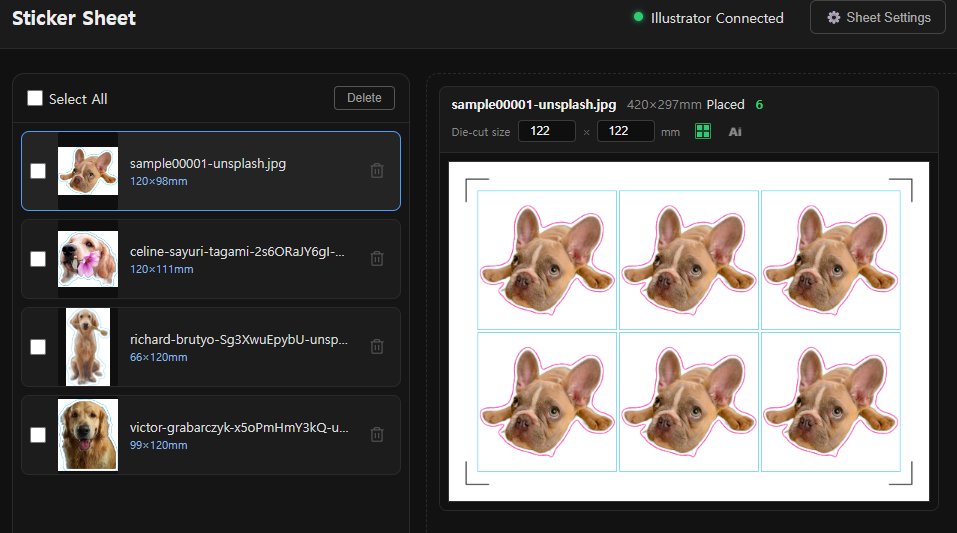
CutContour) and cyan for the inner kiss-cut rectangle (PerfCutContour). The "Illustrator Connected" indicator confirms the live link to Adobe Illustrator, which receives the finished file the moment placement is complete.
Windows 10/11. Code-signed installer. Download →
References
- Roland DG Corporation — VersaWorks 6 User Manual: Performing Cutting. downloadcenter.rolanddg.com
- Roland DG Corporation — VersaWorks Manual: Creating Cut Data. files.rolanddga.com
- Roland DGA — The Perfect Setup: File Preparation For Print/Cut Production. rolanddga.com
- Mimaki Engineering Co., Ltd. — RasterLink7 Reference Guide: Print & Cut Functions. mimaki.com
- Mimaki Engineering Co., Ltd. — RasterLink7 Reference Guide: Print & Cut Operations. mimaki.com
- Graphtec Corporation — Cutting Master 5 product page. graphteccorp.com
- Summa nv — Print & Cut for Summacut: WinPlot + GoSign Plugin + Illustrator. support.summa.eu