KO EN JA
CHAPTER 00

What is Pressria Bridge?

Pressria Bridge (PB) is desktop software that automates repetitive tasks in print production. It automatically arranges order images on sheets (nesting) and integrates with Adobe Illustrator to generate print-ready files in one step.

ℹ️
What is Nesting? Nesting is the process of arranging multiple images onto a single print sheet with minimal gaps. Doing this manually is time-consuming and wastes material, but automating it with an algorithm greatly improves layout efficiency and production speed.

Are you experiencing these problems?

  • Spending too much time manually placing order images onto sheets one by one
  • Uneven spacing between images causes material waste
  • When orders pile up, layout work falls behind and meeting deadlines becomes difficult
  • You have to manually remove backgrounds and create cut lines for die-cut products like stickers and keyrings
  • You manually set up spot color layers every time you open nesting results in Illustrator

Pressria Bridge automates all of these processes.

How does it work?

  1. File Input — Drag and drop AI/PDF/PNG files or place them in a hot folder for automatic detection
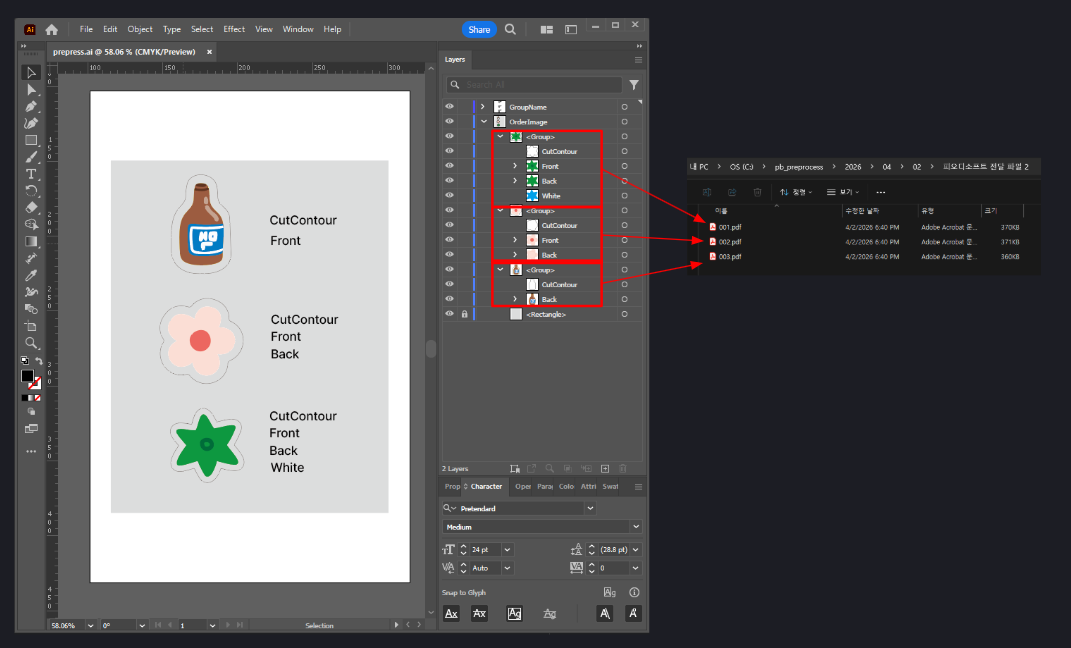
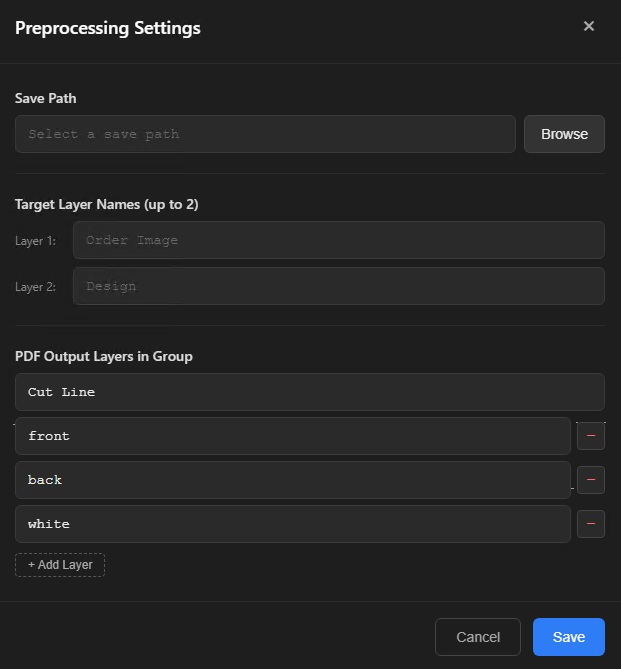
  2. Preprocessing — Automatically separates each group in an AI file into individual PDFs
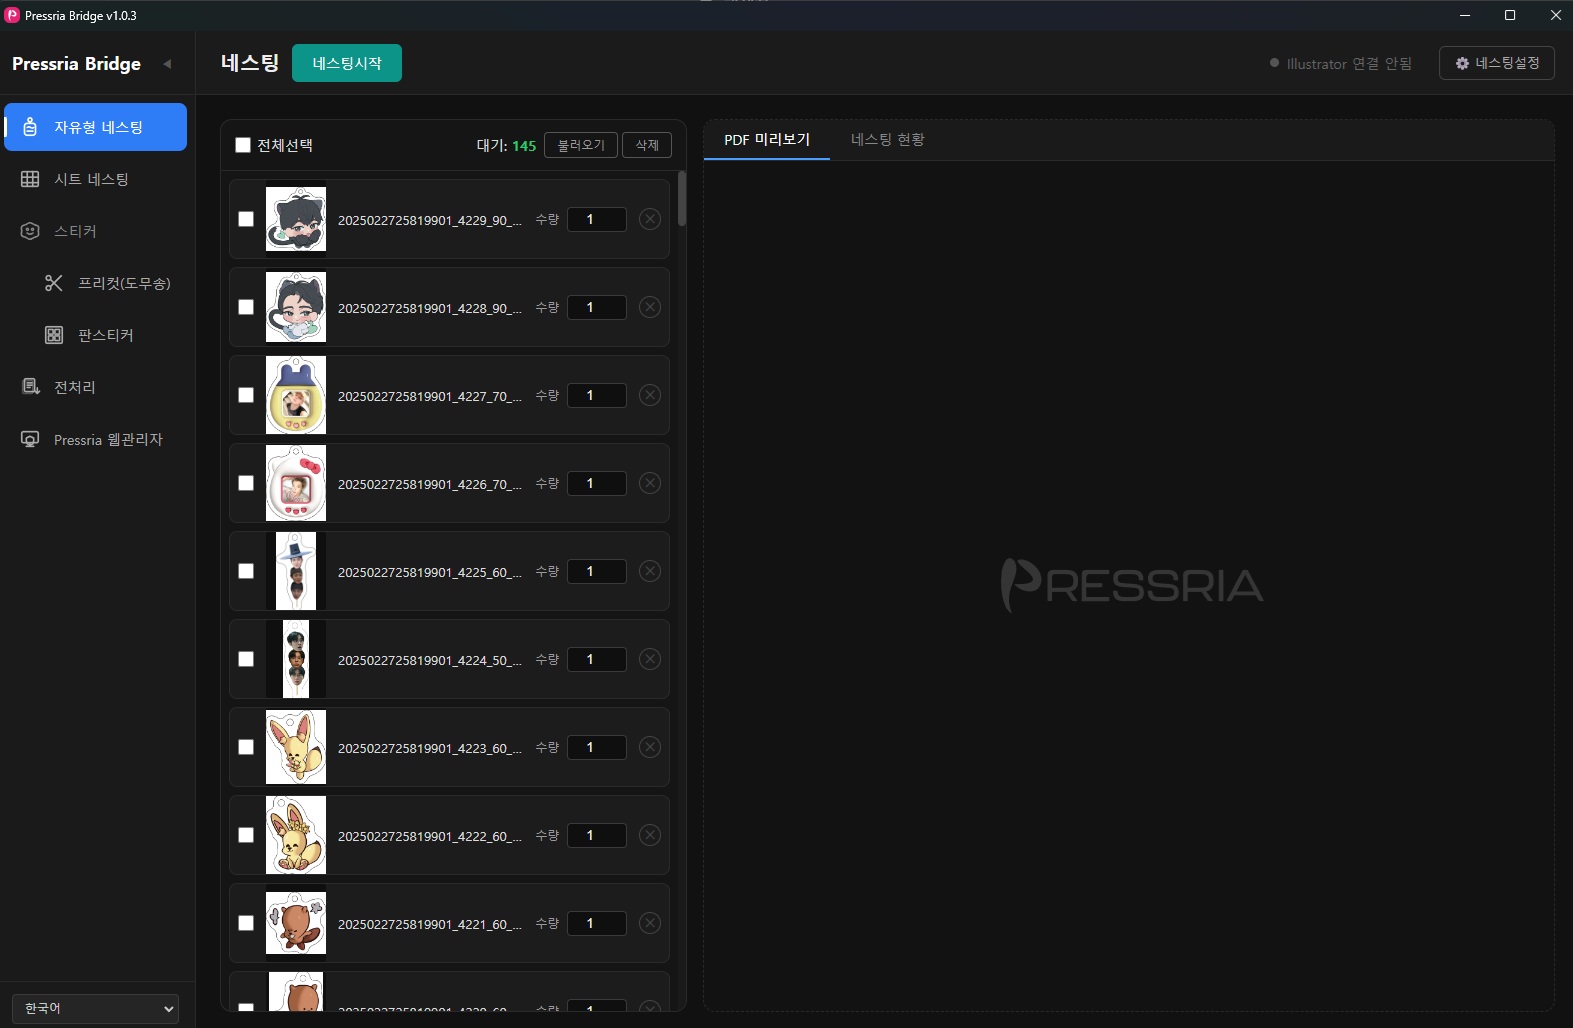
  3. Auto Nesting — Optimally arranges images according to sheet size, spacing, rotation, and other settings
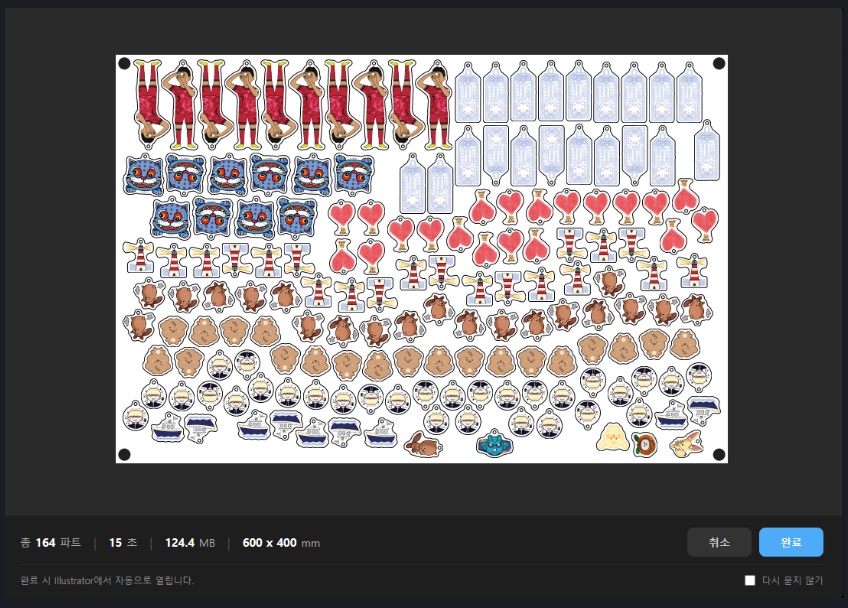
  4. Result Output — Nesting results are generated as PDF files and automatically opened in Illustrator
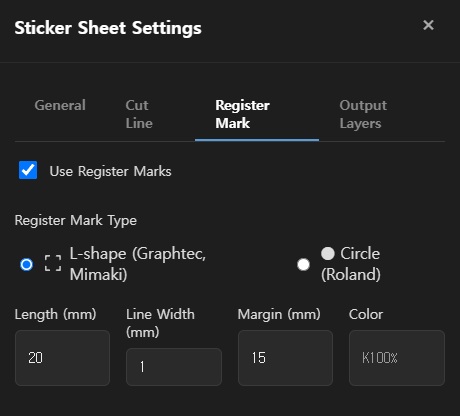
  5. Ready to Print — Print-ready files are completed with cut lines, white ink, and register marks

Key Features

FeatureDescription
Auto NestingOptimally arranges images on sheets to minimize material waste
Group NestingDivides multiple orders into groups and places them sequentially on a single sheet. Makes sorting after cutting easier
Hot Folder AutomationMonitors a designated folder and automatically processes nesting when new files are added
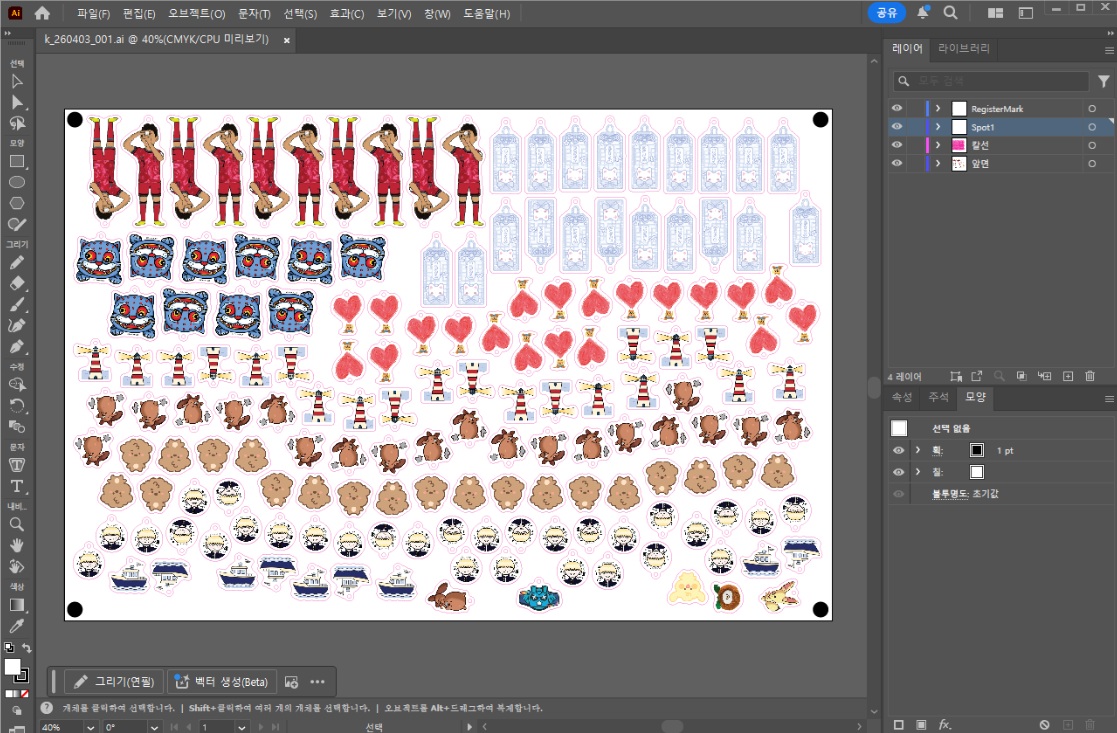
Illustrator IntegrationAutomatically opens nesting results in Illustrator and generates spot color layers
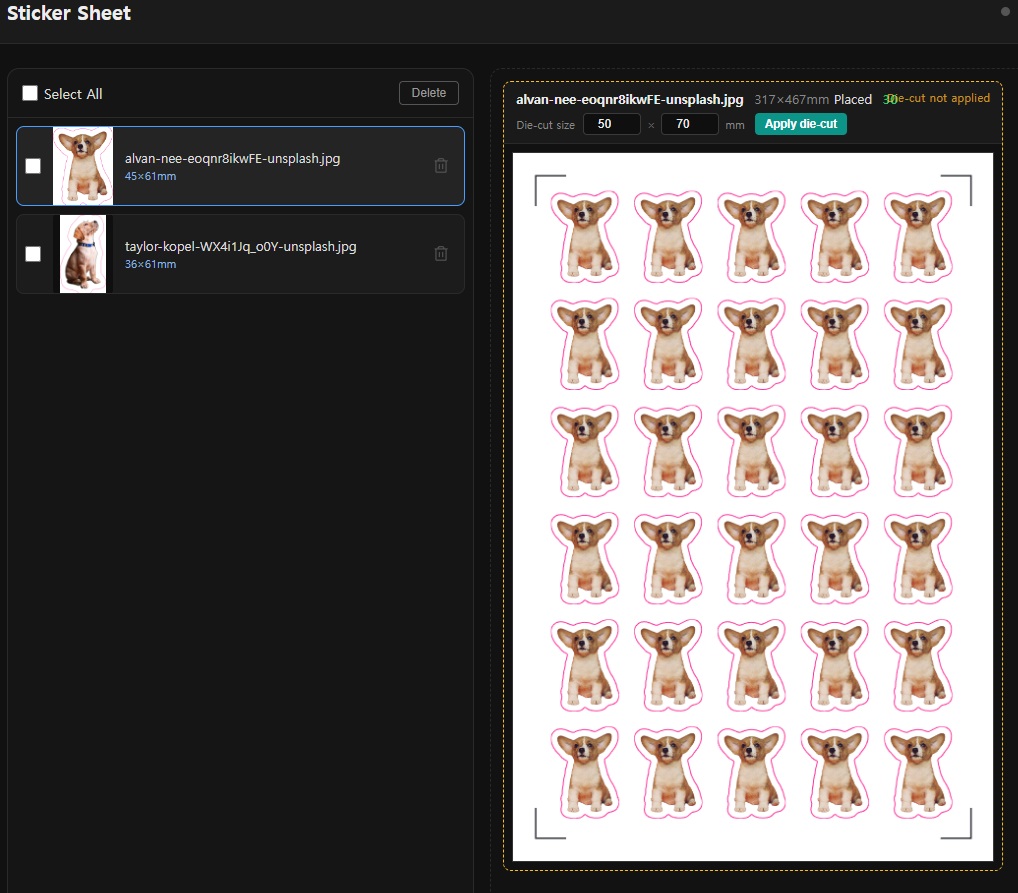
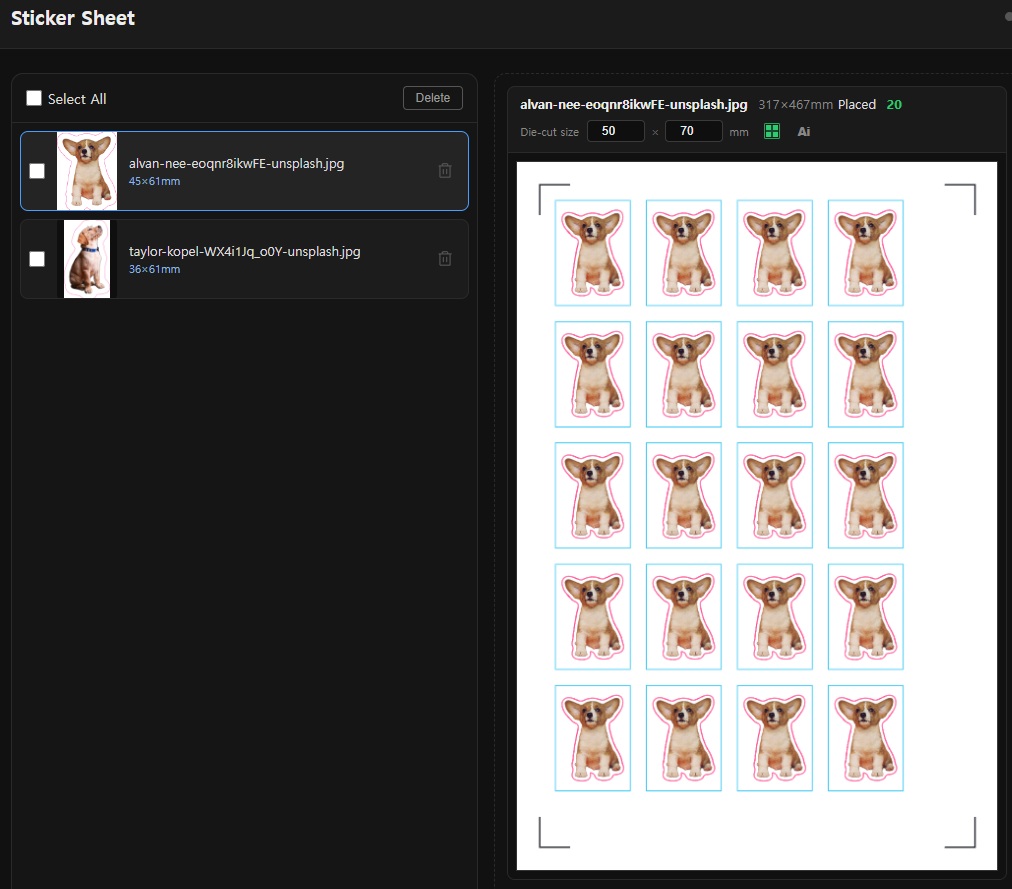
StickerAI-powered background removal and automatic cut line generation simplifies production of die-cut products like stickers and keyrings
Pressria Pod IntegrationIntegrates with the online order management system to automate the entire process from order receipt to output
Jig Placement PlannedJig-based repetitive placement feature (coming soon)
ℹ️
What is a Hot Folder? A hot folder is an input folder that PB continuously monitors. When files are added, they are automatically processed according to pre-configured rules. You can set the hot folder path in the settings for each feature (irregular nesting, sheet nesting, sticker). PB must be running in the background for this to work.

Who uses it?

  • Print shops producing die-cut products such as stickers, keyrings, and phone cases
  • Digital printing facilities using UV printers and flatbed printers
  • Operators spending significant time on layout work while handling small-quantity, high-variety orders
  • Businesses that need workflow automation from order management to print output

System Requirements

ItemRequirement
Operating SystemWindows 10 / 11 (64-bit)
CPUIntel Core i5 or higher (multi-core recommended)
RAMMinimum 8GB / Recommended 16GB or more
DiskApprox. 500MB for installation + additional space for work files
Adobe IllustratorCC 2019 or later (required for CEP integration)
InternetRequired for device registration, account authentication, and auto updates (offline use available for up to 3 days)

Document Structure

Each chapter can be read independently. If you are a first-time user, we recommend following the order 01 → 02 → 03.

ChapterContents
01. Installation & SetupDownload, trial, environment settings, auto update
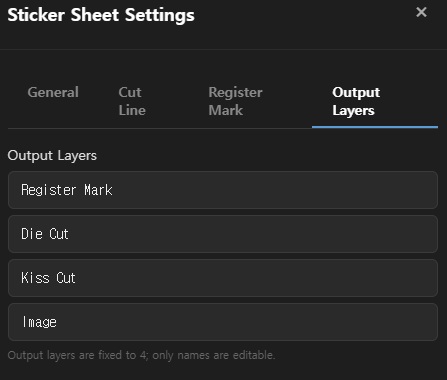
02. PreprocessingAI file group separation, individual PDF conversion, output layer settings
03. Irregular NestingIrregular image placement for stickers/keyrings, group nesting, nesting settings
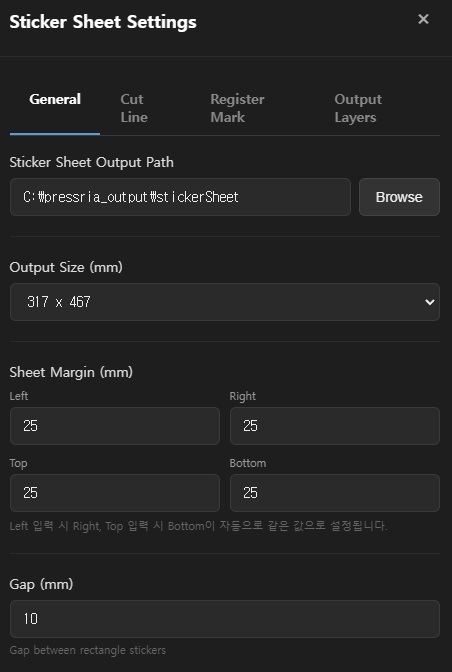
04. Sheet NestingRectangular print placement for banners/signage
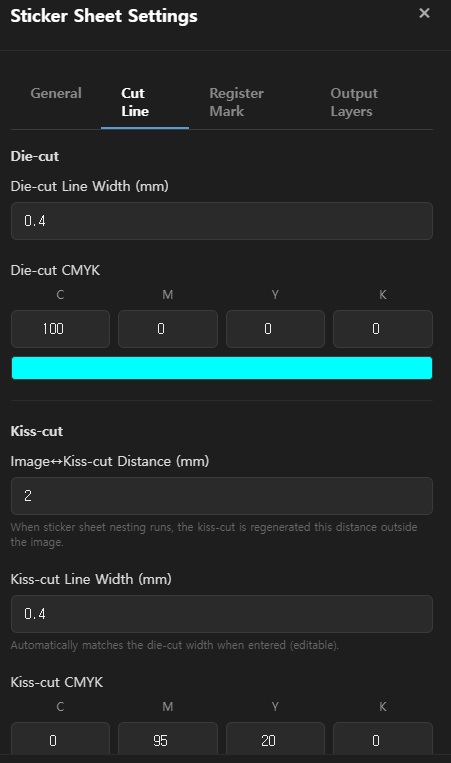
05. StickerAI background removal, automatic cut line generation, sticker PDF output
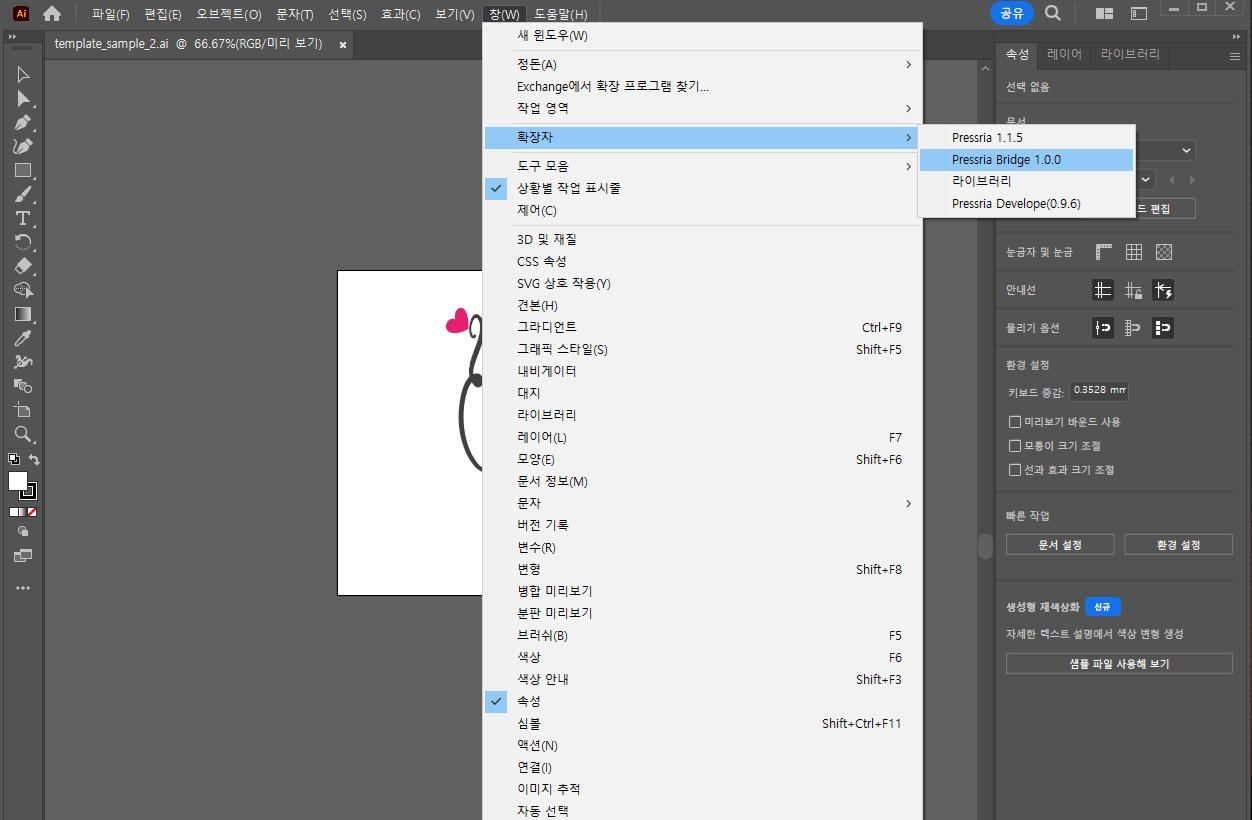
06. Illustrator CEP IntegrationAI plugin setup and automation
07. FAQ / TroubleshootingFrequently asked questions and error handling
CHAPTER 01

Installation & Setup

Set up the environment to install and start using Pressria Bridge. Installation takes about 5 minutes.

1. Download & Installation

  1. Download the latest installer ( PressriaBridge-Setup-1.0.10.zip ) from pb.pressria.com.
  2. Run the downloaded file to start the installation wizard.
    Installation wizard first screen
  3. Confirm the installation path and click Install. We recommend using the default path.
  4. After installation, double-click the Pressria Bridge icon on your desktop to launch it.
⚠️
Windows SmartScreen Warning A SmartScreen warning may appear on the first launch. Click More info → Run anyway to proceed normally.
ℹ️
Automatic Illustrator Plugin Installation The Adobe Illustrator CEP plugin is automatically installed when you install PB. No separate plugin installation is required.

2. Trial & License

When you install and first launch PB, a 2-week trial period starts automatically. You can use all features immediately without entering a key or signing up.

Trial Period (2 weeks)

  • Your device is automatically registered upon installation and the trial begins
  • All features are available without restrictions during the trial period
  • You can check the remaining trial period on the PB screen
🖼
SCREENSHOT
Trial period information screen

Activating a Full License

After the trial period ends, you need to register a Pressria Pod account for continued use.

  1. Create an account at pod.pressria.com.
  2. Log in to PB with your Pod account.
  3. Your device is automatically authenticated and full access is enabled.
ℹ️
Automatic Device Registration The license is automatically linked to the installed device. No separate key entry is required. To use on a different PC, first disconnect the existing device, then log in on the new device.

3. Auto Update

PB automatically checks for the latest version on launch. When a new version is available, a notification is displayed, and clicking confirm will start the automatic update.

💡
Note During Updates Do not run nesting jobs while an update is in progress. PB will automatically restart after the update is complete.

4. Offline Usage

PB can be used for up to 3 days without an internet connection. After 3 days, an internet connection is required for license re-authentication.

⚠️
Offline Grace Period Expiration If the offline state continues for more than 3 days, PB features will be restricted. Connecting to the internet will automatically re-authenticate and restore full functionality.
CHAPTER 02

Preprocessing

Preprocessing automatically separates each design (group) from Illustrator files into individual PDFs. The separated PDFs include layers such as cut lines, front, back, and white, ready for immediate use in nesting.

1. What Is Preprocessing?

Print shops often receive a single AI file from customers containing multiple designs grouped together. Manually separating each design is time-consuming and error-prone.

PB's preprocessing feature automates this process:

  1. Detects each group in the specified layer of the AI file
  2. Automatically generates individual PDFs for each group
  3. Each PDF includes layers such as cut line, front, back, and white
  4. The generated PDFs can be used directly for nesting
Before preprocessing (3 groups in AI file) → After preprocessing (3 individual PDFs)

2. Preprocessing Settings

Click Preprocessing in the left menu, then open the settings window with the settings button.

SettingDescription
Save PathFolder where preprocessed PDF results are saved
Target Layer Name (max 2)Layer names in the AI file to separate into individual PDFs. Each group within these layers is converted into a single PDF.
PDF Output Layers in GroupList of layer names included in each group (e.g., cut line, front, back, white). These layer names are automatically separated in Illustrator when nesting is complete. You can add layers with the + Add Layer button.
Preprocessing settings screen
ℹ️
What is the Target Layer Name? It is the name of the layer in the customer's AI file that contains the design groups. For example, if an AI file has a layer named "Design" containing 3 keyrings each as a group, enter Design as the target layer name.

3. How to Use

  1. Click Preprocessing in the left menu.
  2. Load the AI file received from the customer.
  3. Each group within the configured Target Layer Name (e.g., Design, Order Images) is detected and separated into individual PDFs. Each PDF includes the layers defined in PDF Output Layers in Group (cut line, front, back, white, etc.).
  4. Copy the generated individual PDFs from the save path to the nesting hot folder, or drag and drop them.

4. Relationship Between Output Layers and Nesting

The layer names set in PDF Output Layers in Group are reflected directly in the nesting results.

  1. Preprocessing generates individual PDFs containing cut line, front, back, and white layers
  2. When these PDFs are nested, the same layer structure is maintained in the result file
  3. When you open the nesting result in Illustrator, the layers are automatically separated and ready for printing
💡
Full Workflow Customer AI file → Preprocessing (generate individual PDFs) → Nesting (sheet placement) → Illustrator (output file with separated layers) → Print

5. When Preprocessing Is Not Needed

In the following cases, you can nest directly without preprocessing:

  • When you already receive files as individual PDFs
  • When using the Sticker feature for background removal + automatic cut line generation
  • When using sheet nesting (rectangular placement)
CHAPTER 03

Free-form Nesting

Free-form nesting optimally arranges various shaped images such as stickers, keychains, and phone cases on a single print sheet. It minimizes material waste by arranging images tightly based on their outlines (cut lines).

1. PDF File Input

Free-form nesting supports PDF files only. You can input files in two ways.

Input Methods

MethodDescription
Drag & DropDrag PDF files directly from Explorer into the PB window. You can drag multiple files at once.
Hot FolderCopy PDFs to the hot folder path specified in nesting settings, and they will be detected automatically.
PDF file drag and drop input

PDF File Requirements

To perform nesting, the PDF file must contain a cut line layer. The cut line layer name must match the name defined in Cut Line → Cut Line Name in the nesting settings.

PDF cut line layer structure example
⚠️
Cut Line Layer Required If the PDF does not have a cut line layer, or if the layer name differs from the cut line name in nesting settings, nesting will not be performed. For example, if the cut line name is set to CutContour, the PDF must have a layer named CutContour.

2. Nesting Settings

Click the Nesting Settings button to open the settings window, which has 5 tabs: Basic, Register Marks, Cut Line, Output, and Quantity Rules.

Basic Settings

SettingDescription
Hot Folder PathFolder path to monitor for nesting input files
Nesting Output PathFolder where nesting result files are saved
Output Size (mm)Width × Height of the print material (presets available)
Nesting Gap (mm)Minimum spacing between images
Nesting RotationRotation angle combinations allowed during placement
Sheet Margin (mm)Minimum distance from the sheet edge to images
Skip confirmation on nesting completionSkip the confirmation popup after completion
Auto-download ordered PDFsAutomatically download order PDFs when connected to Pod
Nesting settings — Basic tab

Rotation Options

The nesting rotation setting applies to NFP placement (single-quantity images). Allowing rotation increases placement efficiency, but you can restrict it when print orientation matters.

OptionDescription
Place in original orientation only
0°, 180°Choose optimal between 0° and 180° (most common)
0°, 90°, 180°, 270°Choose optimal from 4 directions (maximum efficiency)
ℹ️
Group Placement Rotation For group placement with quantity 2 or more, 0° and 180° are automatically applied regardless of the rotation setting. The optimal rotation for tightly packing identical images is selected automatically.

Register Mark Settings

SettingDescription
Use Register MarksRegister marks ON/OFF
Register Mark Diameter (mm)Size of the primary mark
Register Mark 2 Diameter (mm)Size of the secondary mark (0 = not used)
Register Mark Margin (mm)Distance from the sheet edge to the marks
White Underlay LayerAuto-generate white ink circles under marks (specify size and spot color name)
OverprintAutomatically apply overprint to spot color areas. When White Underlay Layer is enabled, overprint is applied automatically — no separate setting required.
Nesting settings — Register Marks tab
ℹ️
When register marks are enabled, the mark areas are treated as exclusion zones, so images will not be placed over the marks.

Cut Line Settings

SettingDescription
Cut Line NameName of the cut line layer
Cut Line Thickness (mm)Keep original PDF thickness or enter manually (e.g., 0.1mm)
Cut Line Render ModeStroke (default) — render the cut line as a stroke using the CutContour spot color / Fill — instead of drawing a stroke, fill the cut line area with M:100 CMYK color
Nesting settings — Cut Line tab

Output Settings

Defines the layer order when nesting results are opened in Illustrator. Layers are created in the order set here.

SettingDescription
Output LayersLayer names and order to include in nesting results (e.g., cut line, front, back, white). Add with the + Add Layer button and remove with the - button.
Nesting settings — Output tab
⚠️
Layer Order Must Match The layer order in the input PDF files must match the order in this output setting for layers to be correctly separated after nesting. PDFs generated by preprocessing have the same order as the "PDF Output Layers in Group" setting, so make sure both settings match.

Quantity Rules Settings

OptionDescription
Disabled (quantity = 1)Place all images one at a time
Auto-detect from filenameAutomatically recognize and apply quantity information included in the filename
Nesting settings — Quantity Rules tab

3. Quantity Settings

You can specify the placement quantity for each PDF individually. Enter the desired quantity in the quantity input field next to each PDF in the thumbnail list.

Entering quantities in the thumbnail list

4. Nesting Execution and Auto Placement Method

Click the Start Nesting button to begin automatic placement. PB automatically selects the optimal placement method based on quantity.

Auto Group Placement (Hybrid Nesting)

PB automatically groups images by quantity and places them in two stages:

  1. Images with quantity 2 or more — Identical images are grouped together and placed on the sheet first. Since the same shape is repeated, they are packed tightly with minimal gaps.
  2. Images with quantity 1 — Placed in the remaining area (remnant) after group placement using the NFP algorithm. Placement is optimized for irregular shapes.
Hybrid placement: quantity 2+ groups placed first → quantity 1 placed in remaining area
ℹ️
Automatic Processing This process is performed automatically by PB. There is no need for users to manually specify groups.

Group Placement Flow

When there are multiple orders, PB places parts with the largest area first. Placing larger parts first allows more efficient use of sheet space.

  1. G1 Placement — The group with the largest part area is placed across the entire sheet
  2. Remnant Extraction — The remaining empty space after G1 placement is calculated
  3. G2 Placement — The next largest part group is placed in the remaining area
  4. Repeat — This continues in area order until all groups are placed
Group nesting result — groups distinguished by color

Export Results

When nesting is complete, click the Finish button. The result file opens automatically in Adobe Illustrator, with register marks, white underlay, and each layer separated in the order specified in Nesting Settings → Output.

Nesting result opened in Illustrator

Any remaining quantities from a group that could not fit on the sheet after nesting are displayed as shown below.

Remaining quantities after nesting

5. Use Cases

  • Automatic sorting by order — Orders with large quantities are automatically grouped and placed first, making sorting after cutting easier
  • Maximizing material efficiency — Identical images are packed tightly first, then remaining space is filled with single-quantity images to reduce material waste
CHAPTER 04

Sheet Nesting

Sheet nesting optimally arranges rectangular prints such as banners, signs, and posters on a sheet. Based on the MaxRects (Maximal Rectangles) algorithm, it performs gap-free rectangular placement to maximize material utilization.

1. Difference from Free-form Nesting

ItemFree-form NestingSheet Nesting
TargetIrregular shapes such as stickers, keychains, phone casesRectangular prints such as banners, signs, posters
Placement methodCut-line based, NFP algorithmMaxRects algorithm-based optimal rectangular placement
Placement timingBatch processing after nesting startsReal-time placement (reflected immediately when files are added)
Cut linesRequired (based on image outline)Not required (rectangular boundary)
Group nestingSupportedSupported
Hot folderSupportedSupported (dedicated panel hot folder)
Illustrator integrationSupportedSupported

2. How to Use

  1. Select Sheet Nesting from the top tab.
  2. Import the image files to nest. The size (width × height) and quantity of each image are displayed in the list.
  3. Set the sheet size and margins.
  4. When files are added, placement is reflected in real time. Results can be checked immediately without a separate nesting start button.
Sheet nesting screen — file list and real-time nesting result
💡
Real-time Placement When files are added or quantities are changed, the placement result is updated immediately. Unlike free-form nesting, no separate nesting execution is required.

3. Panel Settings

Click the Panel Settings button to open the settings window, which is divided into a Basic tab and a Register Mark tab.

Basic Settings

SettingDescription
Panel hot folder pathWatched folder path dedicated to sheet nesting
Panel output pathFolder where nesting result files are saved
Sheet width / height (mm)Width × height of the print material
Box spacing (mm)Gap between placed images
Sheet margin (mm)Minimum distance from the sheet edge to images
Sheet nesting settings — Basic tab

Register Mark Settings

SettingDescription
Use register marksRegister mark ON/OFF
Register mark positionIndividually select mark positions at corners and edge centers of the sheet
Register mark diameter (mm)Size of the mark
Register mark margin (mm)Distance from the sheet edge to the mark
Sheet nesting settings — Register mark tab (mark position selection UI)
ℹ️
Register Mark Position Selection You can individually toggle ON/OFF the marks at the four corners and the center of each edge, for a total of 8 positions. Configure according to your cutting equipment specifications.

4. White Underlay Layer / Overprint

Sheet nesting also supports white underlay layer and overprint settings required for print output.

SettingDescription
White underlay layerAutomatically generates a white ink layer beneath images for printing on transparent materials. You can specify the white circle size (mm) and spot color name.
OverprintAutomatically applies overprint to spot color areas. No need to set overprint separately in Illustrator.
Sheet nesting settings — White underlay layer and overprint options

5. Results & Output

Nesting results provide a preview for each sheet. You can check the utilization rate (%) and placement count per sheet.

Click the Complete button for each sheet to generate the result file. When integrated with Illustrator CEP, the file opens automatically.

Sheet nesting result — utilization rate and complete button per sheet
💡
Hot Folder Integration When a dedicated panel hot folder is set, files added to the watched folder are automatically placed in real time. As orders come in, placement is automated, eliminating manual work.

6. Use Cases

  • Banners / Large-format prints — Optimally arrange various sized banners on large-format materials
  • Signs / Information boards — Efficiently place multiple types of signs on a single sheet
  • Synthetic paper / Coated paper prints — Arrange prints of various sizes per order without material waste
CHAPTER 05

Sticker

The Sticker feature performs AI-based background removal and automatic cut line generation from images. For die-cut products such as stickers and keychains, you only need to provide the image — a print-ready PDF is generated automatically. The Sticker menu consists of the following two sub-menus.

  • Die Cut — Removes the background of each individual image and automatically generates die-cut / kiss-cut lines, producing a PDF for die-cut printing.
  • Sticker Sheet — A menu for sheet-format sticker work that arranges multiple stickers on a single sheet for output.

1. Die Cut Settings

Click Sticker → Die Cut in the left menu, then open the Die Cut settings window using the settings button.

Basic Settings

SettingDescription
Hot folder pathFolder path to monitor for sticker images
Output pathFolder where result PDFs with background removal and cut lines are saved

Background Removal Settings

Select the AI model for background removal. Speed, quality, and memory usage vary by model.

ModelCharacteristics
u2netpFastest, size ~4MB, memory 300MB
u2netFast, size ~170MB, memory 500MB
isnetBalanced, size ~170MB, memory 500MB
birefnet-liteHigh quality, size ~100MB, memory 800MB
birefnetHighest quality, size ~350MB, memory 2GB+
ℹ️
The selected model is automatically downloaded on first use.
⚠️
Choose a model that matches your PC specs — selecting the wrong one may crash your PC Model execution is affected by both RAM and GPU (VRAM). Choosing a model too heavy for your PC may cause the system to freeze or crash. It is recommended to start with u2netp or u2net, then gradually try higher-tier models if no issues occur.

Cut Line Settings

Die-cut — Always generated.

SettingDescription
Image↔cut line distance (mm)Margin (offset) from the image edge to the cut line (e.g., 4mm)
Cut line thickness (mm)Thickness of the generated cut line (e.g., 0.1mm)

Add Kiss-cut — When checked, an additional kiss-cut line (for folding/perforating) is generated inside the die-cut line.

SettingDescription
Image↔kiss-cut distance (mm)Margin (offset) from the image edge to the kiss-cut line (e.g., 2mm)
Kiss-cut thickness (mm)Thickness of the generated kiss-cut line (e.g., 0.1mm)

Cut Line Spot Color Settings — When checked, applies spot colors to the die-cut / kiss-cut lines and lets you specify the spot color names.

SettingDescription
Die-cut spot color nameSpot color name for the die-cut line (default: CutContour)
Kiss-cut spot color nameSpot color name for the kiss-cut line (default: PerfCutContour)

Common

SettingDescription
Mask shrink (mm)Shrinks the background removal mask to remove residual background (e.g., 0.01mm)
Sticker settings — full screen

Registration Mark Settings

Adds registration marks to the output so the cutting plotter can identify the cut line position.

Use registration marks — When checked, registration marks are generated together in the output PDF.

SettingDescription
Mark typeChoose L-shape (Graphtec, Mimaki, etc.) or Circle (Roland) to match the cutting plotter
Length (mm)Length of one side of the L-shape mark (e.g., 20mm)
Line thickness (mm)Thickness of the mark line (e.g., 1mm)
Margin (mm)Margin from the outer cut line to the registration mark (e.g., 15mm)
ColorPrint color of the registration mark (default: K100%)
ℹ️
Select the registration mark type that matches your cutting plotter model for proper recognition. Graphtec and Mimaki series use L-shape; Roland series uses Circle.
Sticker settings — registration marks

Output Layer Settings

Specifies the layer names shown when the output PDF is opened in Illustrator. The layers are fixed at four; only the names can be edited.

LayerDescriptionDefault Name
Registration markLayer containing the registration marksRegister Mark
Die-cutLayer containing the die-cut (fully-cut) lineDie Cut
Kiss-cutLayer containing the kiss-cut (half-cut / fold) lineKiss Cut
ImageLayer containing the background-removed original imageImage
ℹ️
If your existing workflow (RIP presets, actions, cutting plotter settings, etc.) uses specific layer names, change them to match.
Sticker settings — output layers
⚠️
Insufficient Resolution Warning If the original image resolution is lower than the configured sticker size, an insufficient-resolution warning appears in the file list. Print quality may be degraded — use a larger image or reduce the sticker size.
Sticker insufficient resolution warning screen

2. How to Use Die Cut

  1. Set the hot folder path and output path in Die Cut settings.
  2. Copy image files (PNG, JPG, etc.) to the hot folder.
  3. PB automatically performs background removal → cut line generation → PDF output.
  4. The PDFs generated in the output path can be used directly for nesting.
Before/after background removal comparison Automatic cut line generation result Sticker output result
💡
Accuracy Improvement Tip The greater the color contrast between background and subject, the higher the background removal accuracy. For top quality, select the birefnet model.

3. Sticker Sheet Settings

Sticker Sheet is a menu for sheet-format sticker work that arranges multiple stickers on a single sheet for output. Click Sticker → Sticker Sheet in the left menu, then open the Sticker Sheet settings window using the settings button. The settings window consists of four tabs: Basic Settings / Cut Line Settings / Registration Marks / Output Layers.

Basic Settings

SettingDescription
Sticker Sheet output pathFolder where nesting result PDFs are saved
Output size (mm)Sheet size. Choose from presets (600 x 400, 420 x 297 (A3), 500 x 350, 317 x 467) or Custom
Sheet margin (mm)Margin from the sheet edge to the sticker-placeable area. Enter Left / Right / Top / Bottom individually
Gap (mm)Gap between rectangular stickers
ℹ️
For sheet margins, entering Left auto-fills Right, and entering Top auto-fills Bottom with the same value. To set them differently, simply edit the auto-filled value directly.
Sticker Sheet — Basic Settings

Cut Line Settings

Sticker Sheet generates both Die-cut and Kiss-cut lines.

Die-cut — Rectangular fully-cut line

SettingDescription
Die-cut line thickness (mm)Thickness of the die-cut line (e.g., 0.4mm)
Die-cut CMYKColor of the die-cut line (default: C100 M0 Y0 K0 — cyan)

Kiss-cut — Free-form kiss-cut line that follows the image outline

SettingDescription
Image↔kiss-cut distance (mm)Margin from the image edge to the kiss-cut line. During Sticker Sheet nesting, the kiss-cut is regenerated outward by this distance (e.g., 2mm)
Kiss-cut line thickness (mm)Thickness of the kiss-cut line. Auto-set to match the die-cut thickness on input, but editable (e.g., 0.4mm)
Kiss-cut CMYKColor of the kiss-cut line (default: C0 M95 Y20 K0 — magenta tone)
Sticker Sheet — Cut Line Settings

Registration Marks

Adds registration marks at the sheet corners so the cutting plotter can identify the cut line position.

Use registration marks — When checked, registration marks are generated at the corners of the sheet in the output PDF.

SettingDescription
Mark typeChoose L-shape (Graphtec, Mimaki, etc.) or Circle (Roland) to match the cutting plotter
Length (mm)Length of one side of the L-shape mark (e.g., 20mm)
Line thickness (mm)Thickness of the mark line (e.g., 1mm)
Margin (mm)Margin from the sheet edge to the registration mark (e.g., 15mm)
ColorPrint color of the registration mark (default: K100%)
ℹ️
Select the registration mark type that matches your cutting plotter model for proper recognition. Graphtec and Mimaki series use L-shape; Roland series uses Circle.
Sticker Sheet — Registration Marks

Output Layers

Specifies the layer names shown when the output PDF is opened in Illustrator. As with Die Cut, the layers are fixed at four; only the names can be edited.

LayerDescriptionDefault Name
Registration markLayer containing the registration marksRegister Mark
Die-cutLayer containing the die-cut (rectangular) lineDie Cut
Kiss-cutLayer containing the free-form kiss-cut lineKiss Cut
ImageLayer containing the background-removed original imageImage
Sticker Sheet — Output Layers

4. How to Use Sticker Sheet

  1. Add image files (JPG, PNG) to the Sticker Sheet screen via drag-and-drop. Copying files into the hot folder path works the same way.
  2. For PNG files, PB automatically performs background removal if the transparent area is 10% or less of the total image. PNGs that are already sufficiently transparent are used as-is.
  3. Clicking an image in the file list displays the nesting result with kiss-cut lines (free-form) in the preview area on the right. In this state, Die-cut not applied appears at the top.
  4. Enter the rectangular die-cut Width × Height (mm) in the Die-cut Size field at the top of the preview, then click Apply Die-cut. The rectangular die-cut is added and nesting is recalculated, updating the placement count (it is normal for the count to decrease by the area the die-cut occupies).
  5. After applying the die-cut, the Ai button becomes active at the top right. Clicking it auto-connects to Illustrator and opens the nesting result in Illustrator, separated into the four layers (Registration mark / Die-cut / Kiss-cut / Image) specified in the Output Layers settings.
ℹ️
Die-cut Size is independent of the thickness/color in the Cut Line Settings tab; it is the actual dimension of the rectangular die-cut, entered per job from the preview screen.
Sticker Sheet nesting — before die-cut (kiss-cut only)
BeforeKiss-cut only — "Die-cut not applied" shown at top
Sticker Sheet nesting — after die-cut applied
AfterDie-cut added, Ai button active — placement count updated
CHAPTER 06

Illustrator CEP Integration

When PB is installed, the Adobe Illustrator plugin is automatically installed. Through this plugin, nesting results are automatically opened in Illustrator, and spot color layer settings are automated.

1. Verify Plugin Installation

When you install PB, the Illustrator CEP plugin is automatically installed. No separate installation is required.

To verify the plugin is installed correctly:

  1. Launch Adobe Illustrator.
  2. Go to Window → Extensions → Pressria Bridge in the top menu.
  3. If the PB panel appears, the plugin is installed correctly.
Illustrator menu — Extensions → Pressria Bridge
ℹ️
Required Version Adobe Illustrator CC 2019 or later is required. If the plugin does not appear, try reinstalling PB or restarting Illustrator.
⚠️
If the Plugin Is Not Visible If the plugin does not appear after installing PB, try running PB once and then restarting Illustrator. PB automatically deploys the plugin files on first launch.

2. Connect with PB

  1. With PB running, open the PB panel in Illustrator.
  2. Click the Connect button in the PB panel.
  3. When the status shows ● Connected, you are ready to go.
PB panel in Illustrator — Connected status

3. Auto-Open Nesting Results

When nesting is completed in PB, the result file is automatically opened in Illustrator. No manual file opening is required.

4. Spot Color Automation

Spot color layers for cut lines, white ink, and more are automatically created.

Layer NamePurpose
CutContourCut line (die cut)
WhiteWhite ink layer
RegisterMarkRegister mark
Illustrator Layers panel — Auto-generated spot color layers
CHAPTER 07

FAQ / Troubleshooting

Frequently asked questions and error resolution methods.

Frequently Asked Questions

Q. How many PCs can PB be installed on?

The license is automatically linked to the installed device, so one account can be used on one PC. To use it on a different PC, disconnect from the current PC first, then log in on the new PC.

Q. How long is the trial period?

After installation, all features are available free for 2 weeks. After the trial ends, you can continue using PB by registering a Pressria Pod account.

Q. What file formats are supported?

Free-form nesting supports only PDF files with a cut line layer. Sheet nesting supports general image files (PDF, PNG, JPG, etc.).

Q. What if the hot folder is not detecting files?

Check that PB is running in the background. You can verify the status via the system tray icon. Also make sure the hot folder activation toggle is turned on.

Q. What if the PB plugin is not visible in Illustrator?

Try running PB once and then restarting Illustrator. PB automatically installs the plugin on first launch. If it still does not appear, try reinstalling PB.

Q. What if Illustrator does not auto-open nesting results?

Check the connection status in the CEP panel and restart both PB and Illustrator. Make sure the status shows ● Connected.

Q. Can I use PB offline?

You can use PB without internet for up to 3 days. After 3 days, you must connect to the internet to re-authenticate your license.

Q. How can I improve sheet utilization?

Try reducing item spacing or setting the rotation option to 180° or 90° increments. Using group nesting can also help fill empty space with other orders.

Q. What if a Windows SmartScreen warning appears?

This may appear on first launch. Click More info → Run anyway to proceed normally.

Error Codes

CodeCauseSolution
E001Device authentication failureCheck internet connection and retry. Verify Pod account login status
E002Unsupported file format or missing cut line layerVerify the file is a PDF with a cut line layer. Check that the cut line name matches nesting settings
E010No write permission for output folderCheck folder permission settings
E020Illustrator connection lostReconnect in the CEP panel

Additional Support

For issues not resolved by this documentation, please contact [email protected].