What is Nesting? — The Core Automation Technology for Print, Sticker & Cutting
What is Nesting? — Auto-Layout Technology for Print & Cutting
Nesting is the technique of arranging multiple shapes on a limited sheet of material as tightly as possible. In the print industry it is also called imposition, step-and-repeat, or auto-layout — though, as we explain in the FAQ below, those terms are not perfect synonyms.
※ Not to be confused with financial "netting" (settlement of offsetting positions). In this article, nesting refers to the material-placement technology used in print and manufacturing.
Simply put, nesting calculates the most efficient way to fit, say, 100 stickers onto a single sheet of material — minimising the area that ends up as offcut waste.
Think of it like packing a suitcase: you arrange every item so no space is wasted. In industrial settings, however, this has to be done mathematically, precisely, and automatically across hundreds or thousands of shapes — and, crucially, while respecting production constraints a suitcase never has, such as cutter spacing, bleed, and rotation limits.
Where is Print Nesting Used?
Nesting is used in almost every industry that cuts material:
- Sticker printing — Optimal placement of die-cut and kiss-cut stickers on sheet material
- Label, keyring & phone-case printing — Maximising sheet utilisation in high-mix, low-volume production
- Apparel — Placing pattern pieces on fabric
- Metal, wood & acrylic processing — Arranging cut shapes on board material (laser cutting, CNC)
- Leather goods — Placing components on irregular hides
The common thread: material costs are a major share of production costs, and every bit of waste eliminated is profit gained.
In sticker and label printing in particular, the effect is amplified because designs of many different shapes must be mixed on a single sheet.
Types of Nesting
1. Rectangular Nesting
The simplest approach. Every shape is wrapped in a bounding rectangle and placed on a grid.
Pros: Fast to compute, easy to implement, and perfectly adequate when the pieces are already rectangular or near-rectangular — for example uniform labels, business cards, or DTF gang sheets.
Cons: Leaves large gaps around circular or irregular shapes. For mixed-shape sticker runs, material utilisation typically reaches only 60–70%.
2. True-Shape (NFP) Nesting
Placement is based on the actual contour of each shape rather than its bounding box. This is where the term No-Fit Polygon (NFP) comes from, and it is worth understanding because it explains both why the technique packs so tightly and why it is computationally heavy.
Picture two shapes, A and B. Hold A fixed, then slide B around the outside of A so that the two are always just touching but never overlapping. The path traced by a fixed reference point on B is the No-Fit Polygon of that pair. The rule is simple:
- Put B's reference point on the NFP boundary → the two shapes touch as closely as possible without overlap (ideal packing).
- Inside the NFP → they overlap (invalid).
- Outside the NFP → there is a gap (wasted space).
A second polygon, the Inner-Fit Polygon (IFP), does the same job against the sheet edge: it describes where a part can sit without spilling off the material. The engine then searches NFP and IFP boundaries to drop each new part into the tightest legal position.
Pros: Irregular sticker shapes are packed with minimal gaps, pushing material utilisation to 80–90%.
Cons: Computing NFPs between every pair of shapes (in every tested rotation) is expensive, so a naive implementation can be slow. Production engines reduce contour complexity first and cache results to stay fast. We go deeper into this in NFP nesting in print, explained.
3. Hybrid Nesting — The Most Effective Approach in Practice
Identical designs are grouped and placed in a fast rectangular grid, while remaining empty space is filled by the true-shape NFP algorithm.
In sticker production shops it is common to print dozens of the same design while simultaneously filling spare space with other orders. Hybrid nesting is purpose-built for this real-world workflow — see how group nesting works for the detail.
This is exactly the approach Pressria Bridge uses.
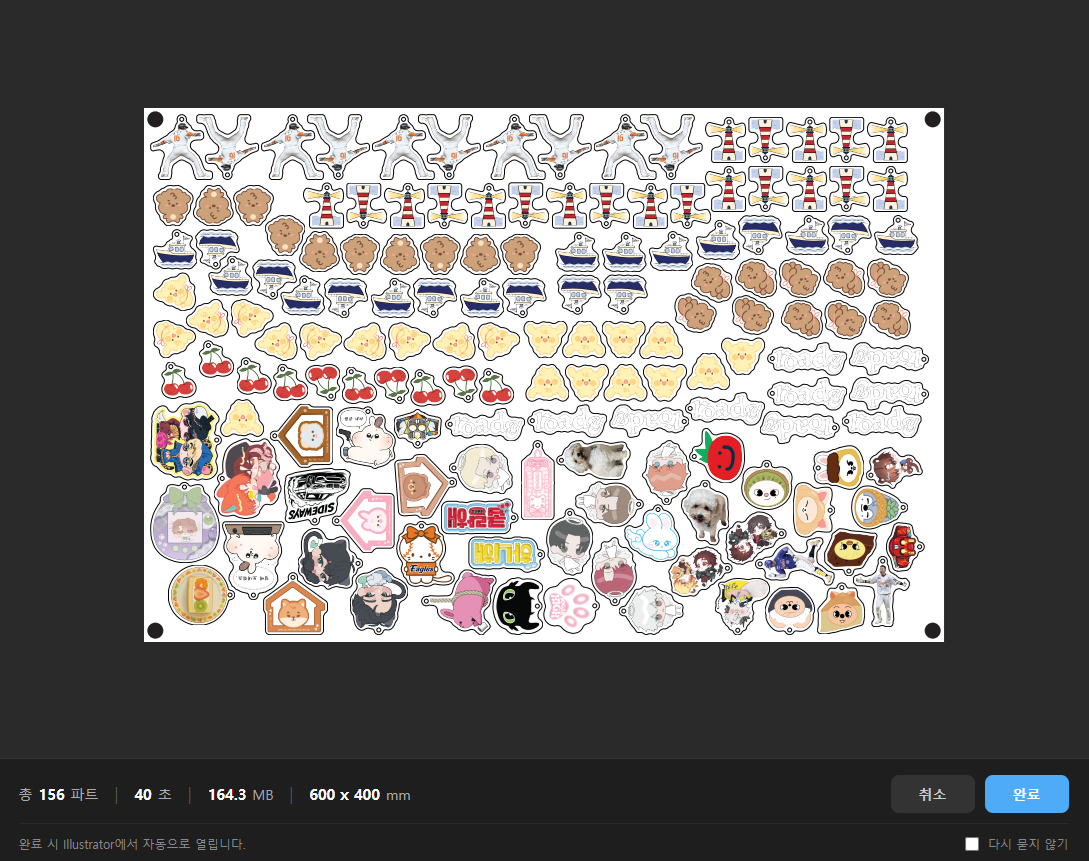
▲ Live Pressria Bridge nesting result. 156 designs of varying shapes are automatically placed on a 600×400 mm sheet in 40 seconds. Identical designs are grouped and aligned at the top; remaining space is filled by the NFP algorithm — the hybrid approach in action.
What Print Nesting Must Account For (Beyond Just Packing)
A common misconception is that nesting is purely a geometry puzzle. In a real print-and-cut shop, the tightest mathematical layout is often not the correct one, because production imposes constraints the raw geometry ignores:
- Bleed. Each piece usually needs artwork extended slightly past its cut line so a small cutting tolerance never exposes a white edge. Nesting must space parts using the bled outline, not the visible artwork.
- Spacing / gutter. Pieces can rarely sit edge-to-edge. The blade or laser has a kerf, the cutter has a registration tolerance, and kiss-cut vs die-cut jobs need different minimum gaps. Pack too tight and adjacent cuts bleed into each other.
- Rotation limits. Free rotation packs tightest, but directional or grained media, and readability of text and logos, often restrict parts to 0 / 90 / 180°. A good engine treats allowed rotations as an input, not an assumption.
- Registration marks & margins. Print-then-cut workflows need registration marks the cutter's optical sensor can read, plus a clear sheet margin. Those zones have to be reserved before packing — see registration marks for print & cut.
- The cut line as a first-class object. The thing being nested is not the image — it is the cut contour, defined as a spot colour so the plotter knows what to cut. Getting that standard right matters as much as the layout; we cover it in the CutContour spot-colour standard.
This is the gap between a generic packing library and a tool built for print: the second one knows that a layout is only useful if it survives the cutter.
The Cost Impact of Nesting in Sticker Printing
A concrete example: consider a print shop producing die-cut stickers daily on A3 sheets (297×420 mm).
- Rectangular nesting: 40 stickers per sheet
- True-shape (NFP) nesting: 52 stickers per sheet
That is about 30% more pieces per sheet, which lines up with the jump from ~60–70% to ~80–90% utilisation noted above. For the same order of 1,000 stickers:
- Rectangular: 25 sheets required
- NFP: 20 sheets required
5 sheets saved per run. Multiply that across dozens of orders per day, and the monthly material savings become very visible. (These figures are illustrative — the actual gain depends heavily on the shape mix, spacing, and rotation rules described above.)
Sticker specialists often use premium UV-printer-grade substrates that cost significantly more per sheet, so the difference in nesting efficiency translates directly into margin.
Manual Layout vs Automatic Nesting — The Reality in Print Shops
Many shops still arrange jobs manually in Adobe Illustrator, relying on the operator's experience and instinct.
Problems with manual layout:
- Results vary from operator to operator
- Finding the optimal placement becomes nearly impossible as shape count grows
- Time-consuming — complex arrangements can take 30+ minutes
- Overlapping shapes can slip through unnoticed
- Quality drops during night shifts or under deadline pressure
Automatic nesting solves all of these. Hundreds of shapes are optimally placed in seconds, with consistent, reliable results every time. For a fuller comparison of one-off toolkits versus a repeatable production line, see toolkit vs production line.
The Full Sticker-Printing Workflow
Nesting does not exist in isolation. The actual production workflow looks like this:
- Design intake — Receive the customer's sticker design file (PDF, AI, PNG, etc.)
- Background removal — Strip the background to isolate the sticker artwork
- Cut-line (CutContour) generation — Create the cutting path that traces the design contour
- Nesting — Optimally arrange multiple designs on the sheet
- Print-ready PDF export — Generate the file ready to send to press
- Print & cut — UV printer output, then plotter cutting
What if the entire pipeline lived in a single app? That is Pressria Bridge — and we break down the end-to-end version in sticker sheet automation.
Pressria Bridge — All-in-One Nesting for Sticker Printing
Pressria Bridge (PB) is a nesting-automation desktop app purpose-built for sticker, label, and keyring printing:
- Hybrid group + NFP nesting — Group placement for identical designs, NFP fill for the rest
- In-house C++ NFP engine — Speed and precision without compromise
- AI background removal — Automatic background stripping powered by rembg/u2netp
- Automatic cut-line generation — CutContour/PerfCutContour spot colours applied automatically
- Print-ready PDF export — Production PDFs with OCG layers preserved
- Adobe Illustrator integration — Review and edit nesting results directly in Illustrator
Mature prepress suites such as Caldera PrimeCenter (from €1,495–5,995/year across its Essentials, Pro and Max tiers) already do true-shape nesting, preflight, bleed, cut marks and ganging very capably. The difference is where the workflow starts: those tools assume the incoming file is already print-ready vector artwork with a defined cut path. PB adds the front end they leave to you — taking a raw raster image through AI background removal → automatic cut-line generation → nesting → Illustrator sync in one app. We are not aware of another single desktop tool that covers that full raster-to-cut path for sticker work.
Frequently Asked Questions
Is nesting the same as imposition or step-and-repeat?
They overlap but are not identical. Imposition and step-and-repeat usually arrange identical pieces or pages in a regular grid, typical of offset and sheet-fed work. Nesting is the broader term and specifically implies fitting mixed shapes and sizes as tightly as possible, including irregular contours — exactly what high-mix sticker and label production needs.
How much material can true-shape (NFP) nesting actually save?
It depends entirely on the shape mix. For uniform rectangles the gain over a simple grid is small. For mixed irregular stickers, true-shape nesting typically lifts sheet utilisation from roughly 60–70% to roughly 80–90%, which can mean 20–30% more pieces per sheet. Circles, long thin shapes, required spacing and rotation limits all change the result, so treat any single number as an estimate, not a guarantee.
Does nesting rotate parts to fit them better?
Good nesting engines test rotations to pack tighter. Free rotation usually packs tightest, but it is not always allowed — directional films, grained or textured media, and text/logo readability often restrict rotation to 0 / 90 / 180°. A print-oriented engine has to respect those limits instead of rotating blindly.
Can I nest different designs on the same sheet?
Yes — that is the main reason print shops use nesting. Combining many different orders and SKUs onto one sheet is exactly where automatic nesting beats manual layout, and where hybrid group + NFP approaches shine.
Do I need expensive enterprise software to nest?
No. Enterprise RIP and prepress suites handle nesting well but typically start in the four-figure-per-year range. Lighter desktop tools cover the same core need at lower cost — and Pressria Bridge adds the raster → background-removal → cut-line front end that most prepress tools assume you have already prepared elsewhere.
Get Started
See for yourself how nesting automation can transform your sticker-printing workflow. Pressria Bridge is free to download and use immediately.
Download Pressria Bridge free: pb.pressria.com