Sticker Sheet — From a Customer's PNG to a Print-Ready Illustrator File in One Click
Most sticker shops don't lose time on printing. They lose it on what comes before printing — receiving a customer file that isn't ready for the cutter, and turning it into one that is.
Pressria Bridge's Sticker Sheet mode takes the two messiest input formats — a JPG with a full background, or a transparent PNG with no cut lines — and pushes a finished, layered Illustrator document to your screen. One click. No file export, no layer renaming, no manual drawing. The Illustrator window opens with the file ready to send to the RIP.
The two files customers actually send
Every sticker shop has seen these two emails:
Case 1 — "Here's my design, please make it into stickers": the attachment is a JPG. The artwork is in the middle, but it's sitting on a white, checkered, or photographic background. The customer wants a sticker of just the subject. Someone has to open Photoshop, mask the subject out, export a clean PNG, and then keep going.
Case 2 — "Here's the PNG, ready to print": the file is transparent and the artwork is isolated. But there are no cut lines. Someone still has to open Illustrator, trace a free-form kiss-cut path around the subject (or fake it with an offset path), draw a rectangular kiss-cut around each piece, draw a rectangular through-cut for the sheet, name the layers correctly for the RIP, and lay out the grid with proper margins for the registration marks.
Both cases end in the same place: an operator spending 15 to 30 minutes per order doing prepress that has nothing to do with design judgment. Multiply by 50 orders a day. That's the entire bottleneck of mid-scale custom sticker production. Not the printer. Not the cutter. The prepress.
What Sticker Sheet replaces
The Sticker Sheet panel in Pressria Bridge collapses the entire prepress chain into a drop-and-click flow.
Drop a JPG with a background? PB runs background removal automatically. The subject is isolated; the alpha channel becomes the source of truth for the free-form cut line. The operator doesn't open Photoshop. The operator doesn't mask anything. The customer's "make this into a sticker" file goes in, and a clean transparent subject comes out — without a separate step.
Drop a transparent PNG? Background removal is skipped. PB goes straight to cut line generation.
Either way, the next step is the same: hit Apply die-cut, and PB generates all three cut layers, lays them out on the sheet, and pushes the result to Illustrator — live.
The three cut layers, generated automatically
Production-grade sticker sheets — the kind a customer peels individual stickers from — need three cut layers stacked on a single PDF:
- Free-form kiss-cut (자유형 반칼) — follows the subject's silhouette. This is what lets the end customer peel one sticker at a time without cutting through the backing paper.
- Rectangular kiss-cut (사각 반칼) — an outer kiss-cut border around each sticker. Defines the visual "card" the sticker sits on.
- Rectangular through-cut (사각 완칼) — a full cut that separates the finished pieces from the rest of the sheet on the cutter bed.
Three layers, per sticker, per sheet. On a 6×3 grid that's 54 individual paths a human would otherwise draw, align, and label — by hand, every order. Skip any one of them and the output is no longer production-grade. Mis-name a layer and the RIP doesn't pick it up. Forget the registration mark margin and the cutter mis-registers.
PB generates all three from the same alpha channel and the same die-cut dimensions you typed in. They are aligned by construction. They cannot drift relative to each other, because the operator never touched them.
Before / After, inside PB
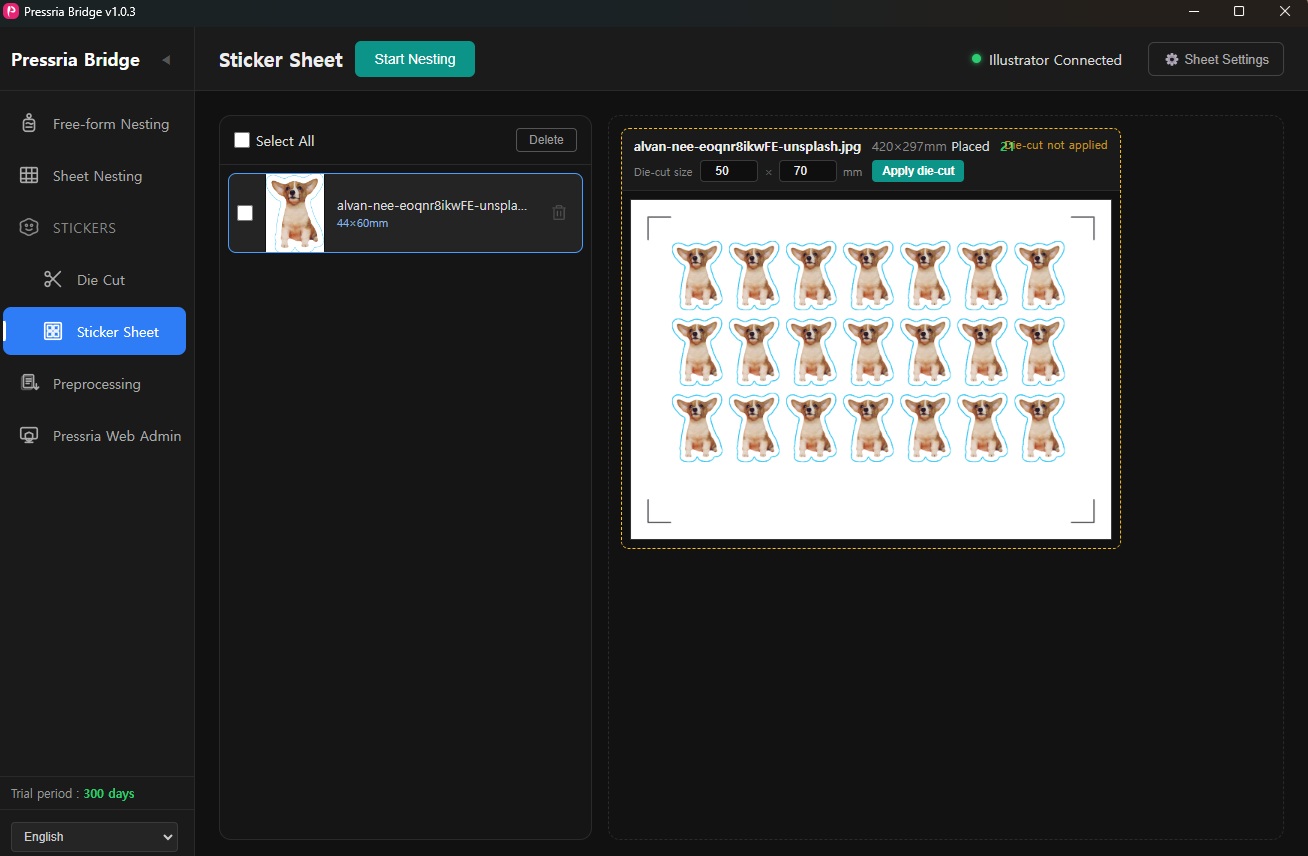
The image is placed on the sheet. The grid fills the available area densely. But "Die-cut not applied" is shown in the header, and the count of 21 placements is a preview number, not a production number. There are no cut lines. No registration mark margin. This file cannot ship.
Then Apply die-cut. PB has done four things in one click: removed the background (if it was a JPG), generated the free-form kiss-cut from the alpha channel, drawn the rectangular kiss-cut and through-cut at 50×70mm around each sticker, and re-laid the grid to make room for the registration mark margins. The count dropped from 21 to 18.
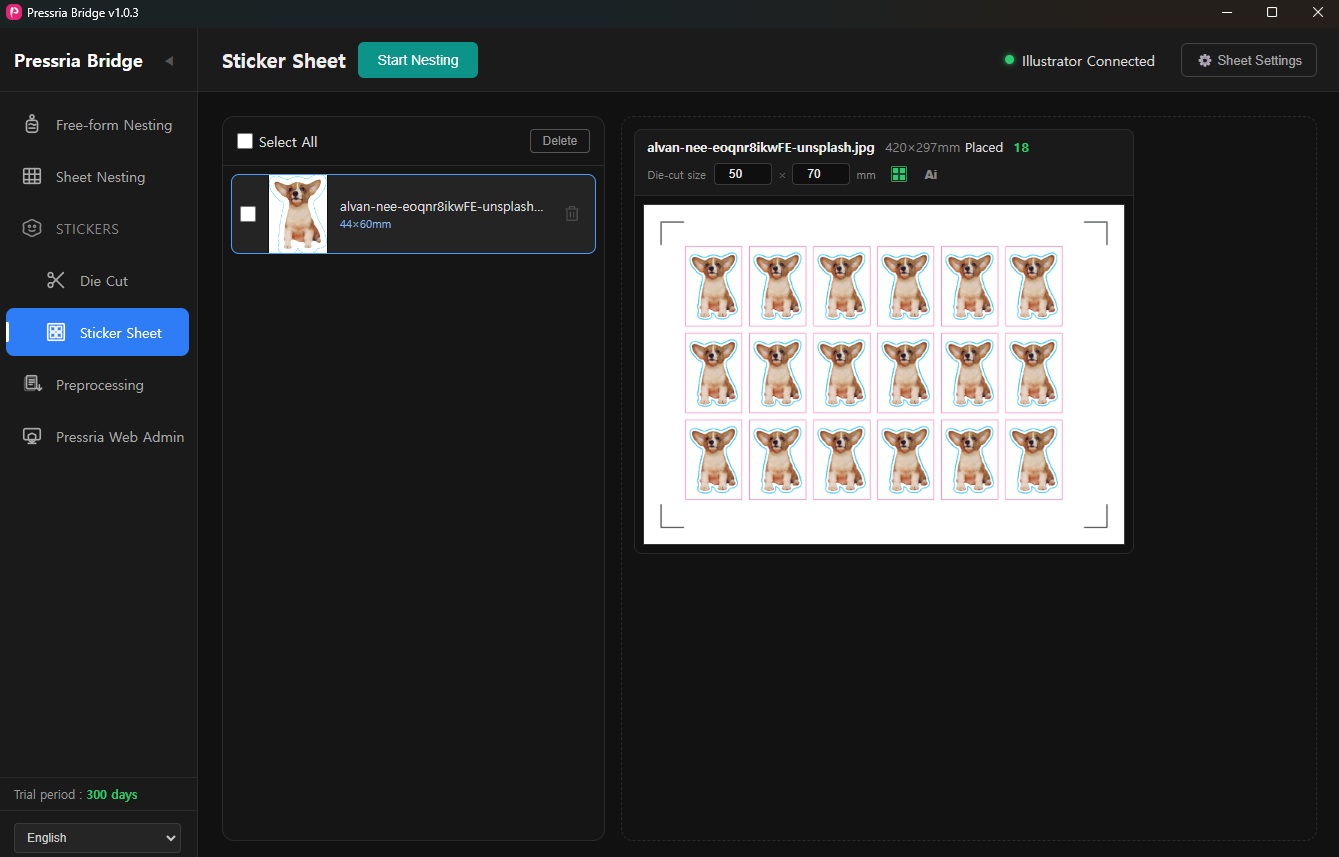
That drop from 21 to 18 is the point, not a regression. The 21 was an unusable preview. The 18 is what actually goes to the cutter. A naive tool that brags about "more stickers per sheet" by ignoring the die-cut margin is the tool whose output you reject at QC.
And then Illustrator opens
This is the part the screenshots above don't show. The moment Apply die-cut finishes, PB pushes the result over a live connection into your running Illustrator session. There is no "export PDF," no "import into Illustrator," no "now open the file from the output folder." The artboard appears, populated, named, layered, and ready.
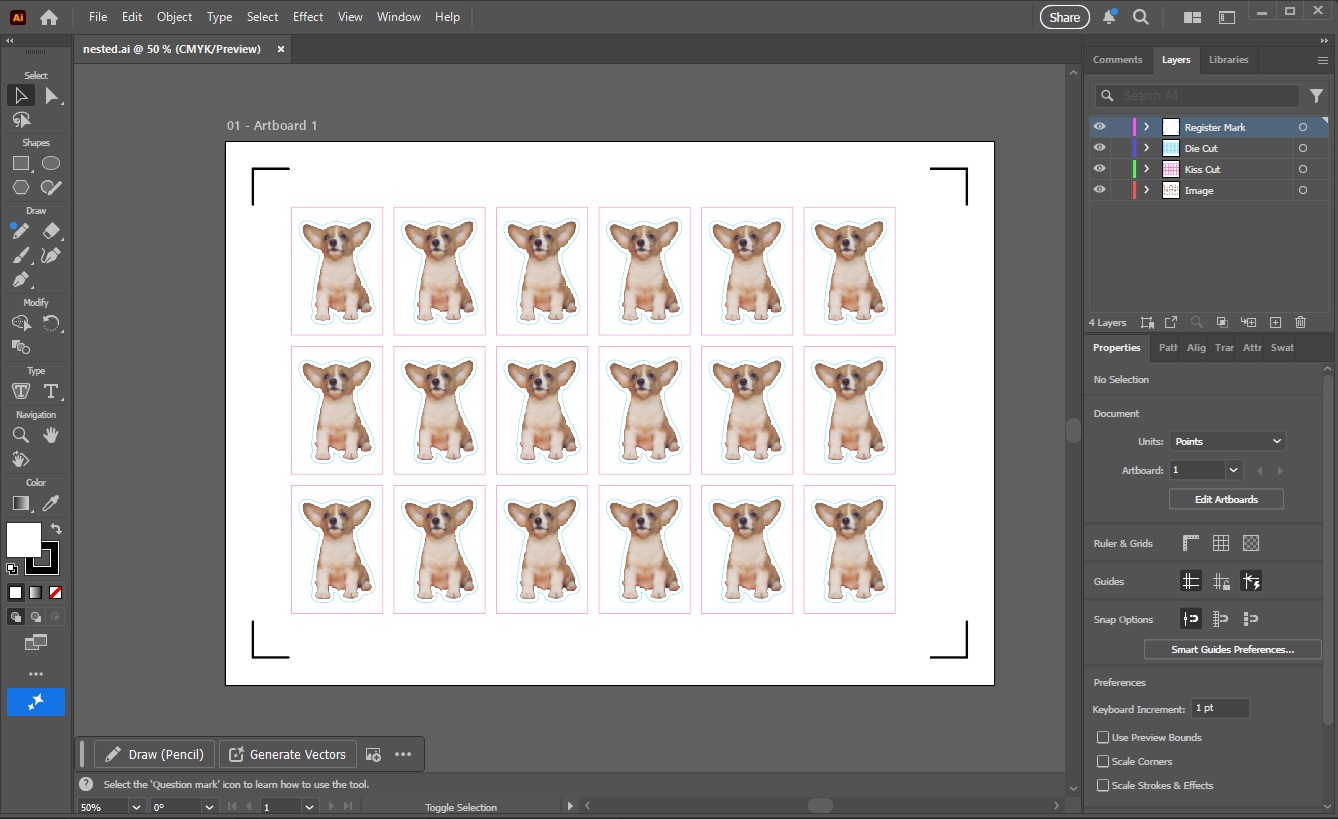
What's on screen is a finished prepress file:
Register Mark— L-shaped corner marks the cutter reads to align the sheetDie Cut— the rectangular through-cut layerKiss Cut— free-form + rectangular kiss-cut pathsImage— the artwork itself
Every layer is named. Every path is on the layer the RIP expects. Every color is in CMYK preview mode. There is no "now I have to rename the layers" step. There is no "wait, which one is the through-cut" step. The file is the file. You hit Print, or you save and hand it to the RIP — that's it.
The status indicator in PB's header — Illustrator Connected — is what makes this work. PB and Illustrator are talking to each other over a CEP plugin, not over the filesystem. When PB computes a new layout, Illustrator sees the new layout. When you adjust a sticker's die-cut size in PB and re-apply, Illustrator updates. Round trips that used to involve "export, re-import, fix layers, re-align" don't happen anymore. They're a single state.
The 4-layer structure isn't arbitrary
This naming convention — Register Mark / Die Cut / Kiss Cut / Image — matches what the production partners we built Sticker Sheet against actually use. The defaults match what real cutters and real RIPs in real shops expect, not what looks good in a demo. If your RIP is already configured to pick up cut paths by layer name, PB's output drops in without reconfiguration. If it isn't, this is the convention worth standardizing on, because it's the one the cutter manufacturers' own examples use.
What you actually save
For a shop running 50 orders a day where each order is one sticker sheet:
- No Photoshop step — background removal is part of the drop-in
- No manual cut lines — three layers generated from the alpha channel
- No layer renaming — Illustrator opens with the stack already correct
- No export / re-import — live CEP connection, not filesystem hand-off
- No margin guesswork — registration mark margins respected by construction
The operator's job becomes: drop the customer file, set the die-cut size, click Apply, send to printer. Everything between "drop the file" and "send to printer" is the part Sticker Sheet replaces.
Why Sticker Sheet is its own mode
Pressria Bridge has Free-form Nesting and Sheet Nesting too, and a reasonable question is why a third mode just for stickers.
The answer is: sticker sheets aren't a packing problem. Free-form Nesting tries to pack irregular shapes as tightly as possible. Sheet Nesting packs rectangles. Both optimize for material yield.
Sticker sheets optimize for production predictability. They use a fixed grid (because the customer wants a clean grid of identical stickers, not a Tetris-packed sheet). They need three coordinated cut layers (because that's how peelable stickers physically work). They need registration mark margins that nesting doesn't have to think about. And they need to land in Illustrator with a layer structure the RIP already understands. Trying to do this in a general-purpose nesting tool means fighting the tool. Sticker Sheet is the mode where every default is wrong for free-form nesting and right for sticker production.
What's not in scope
A few things Sticker Sheet deliberately does not do — and why:
- ICC profile selection. Color management belongs in Illustrator or the RIP, where it can be calibrated against the actual printer. PB is a prepress automation layer, not a color engine. Putting an ICC dropdown here would imply a level of control PB shouldn't claim.
- Auto-inserting QR codes for cut-job matching. The toggle is in the UI; the auto-matching half of the loop activates when the cutter SDK integration lands post-1.0.
- Custom registration mark shapes beyond L-corner and circular dot. These two cover the cutter brands actually deployed in the target market (Graphtec, Roland, Mimaki, Semosae, Summa, Saga, GCC). Adding more for completeness is fake helpfulness.
The takeaway
Sticker sheet prepress is a solved problem — but only if the entire chain is automated. Manual masking, manual cut lines, and manual layer setup each look small in isolation; together they are the reason a sticker shop can't grow past one operator's capacity.
PB's Sticker Sheet mode is what the chain looks like when none of those steps require a human. Customer file in, Illustrator file out, the cutter does the rest.
Pressria Bridge is a Windows desktop application that automates print production workflows including nesting, background removal, cut line generation, and Illustrator integration. Free trial available at pb.pressria.com.