Gang Printing Imposition, Automated — 41 Mixed Jobs Across 2 Sheets With Zero Manual Layout
Every small print and sign shop runs the same quiet, unpaid task several times a day: ganging up. Dozens of unrelated small jobs — flyers, café menus, "No Parking" notices, sale signs, directional arrows — get arranged onto one large press sheet so they all share the same material and the same print run.
And almost everywhere, someone does it by hand. They open Illustrator, drag each piece onto the sheet, eyeball the spacing, rotate to fit one more, and try not to leave expensive blank space at the bottom.
It works. It's also slow, error-prone, and exactly the kind of repetitive packing a computer should be doing. This post walks through how Pressria Bridge (PB) automates gang-printing imposition with Sheet Nesting — and why that part of PB is free.
The gang-printing bottleneck
A real batch from a Korean shop's daily queue (in Korea this combination-printing is called 합판 인쇄; in Japan, 面付け) looks like this:
- 41 different jobs from many different customers
- Mixed sizes — anywhere from 176×275mm up to 400×570mm in the same batch
- Different quantities per job (one customer wants 2 copies, another wants 6)
- A fixed press-sheet size to fill as densely as possible
The economics are simple and unforgiving: leftover sheet space is wasted material, and wasted material is margin you already paid for. The whole point of ganging is to pack the sheet tightly. Do it loosely and you either buy more sheets or eat the loss.
Manual imposition solves this with human patience. Automated imposition solves it with rectangular packing — and that distinction matters more than it sounds.
Why this is rectangular nesting, not True Shape
If you've read our post on acrylic keychain nesting, you've seen True Shape Nesting — packing along the actual contour of irregular cut-out shapes so they interlock. Keychains and die-cut stickers need that, because their outlines are irregular.
Gang-printing jobs are the opposite case. Flyers, menus, and signs are rectangles. There is no irregular contour to interlock — there's just a grid of rectangles of different sizes that need to be packed onto a sheet with correct spacing, bleed, and orientation.
For that, true-shape contour math is the wrong (and slower) tool. The right tool is fast rectangular bin-packing: it places mixed-size rectangles, rotates where it helps, opens additional sheets when one fills up, and reports the fill percentage per sheet. Where True Shape Nesting can run for a minute or more on irregular shapes, rectangular sheet nesting on a batch like this runs in seconds.
Using the right algorithm for the right geometry is the whole game. PB keeps the two as separate modes for exactly this reason.
The PB pipeline: load, nest, sync
The workflow for a gang-printing batch is three steps:
Step 1 — Load the files
Add the customer files to PB's queue (drag them in, or use the Load button) and set the quantity for each job. That's the only manual data entry.
Step 2 — Automatic nesting
PB packs every job across as many sheets as needed at the configured sheet size, respecting per-job quantities and spacing. It fills the first sheet densely, carries the remainder to the next, and shows the fill percentage for each sheet so you can see exactly how much material you're using.
Step 3 — Auto-sync to Illustrator
The nested layout opens in Adobe Illustrator via a CEP plugin, with registration marks added on their own layer. The operator reviews it, makes any last change, and sends to print.
No dragging. No eyeballing gaps. No "let me try to squeeze one more in."
Real numbers from a real sheet
The screenshot below is an actual PB Sheet Nesting result for the batch described above:
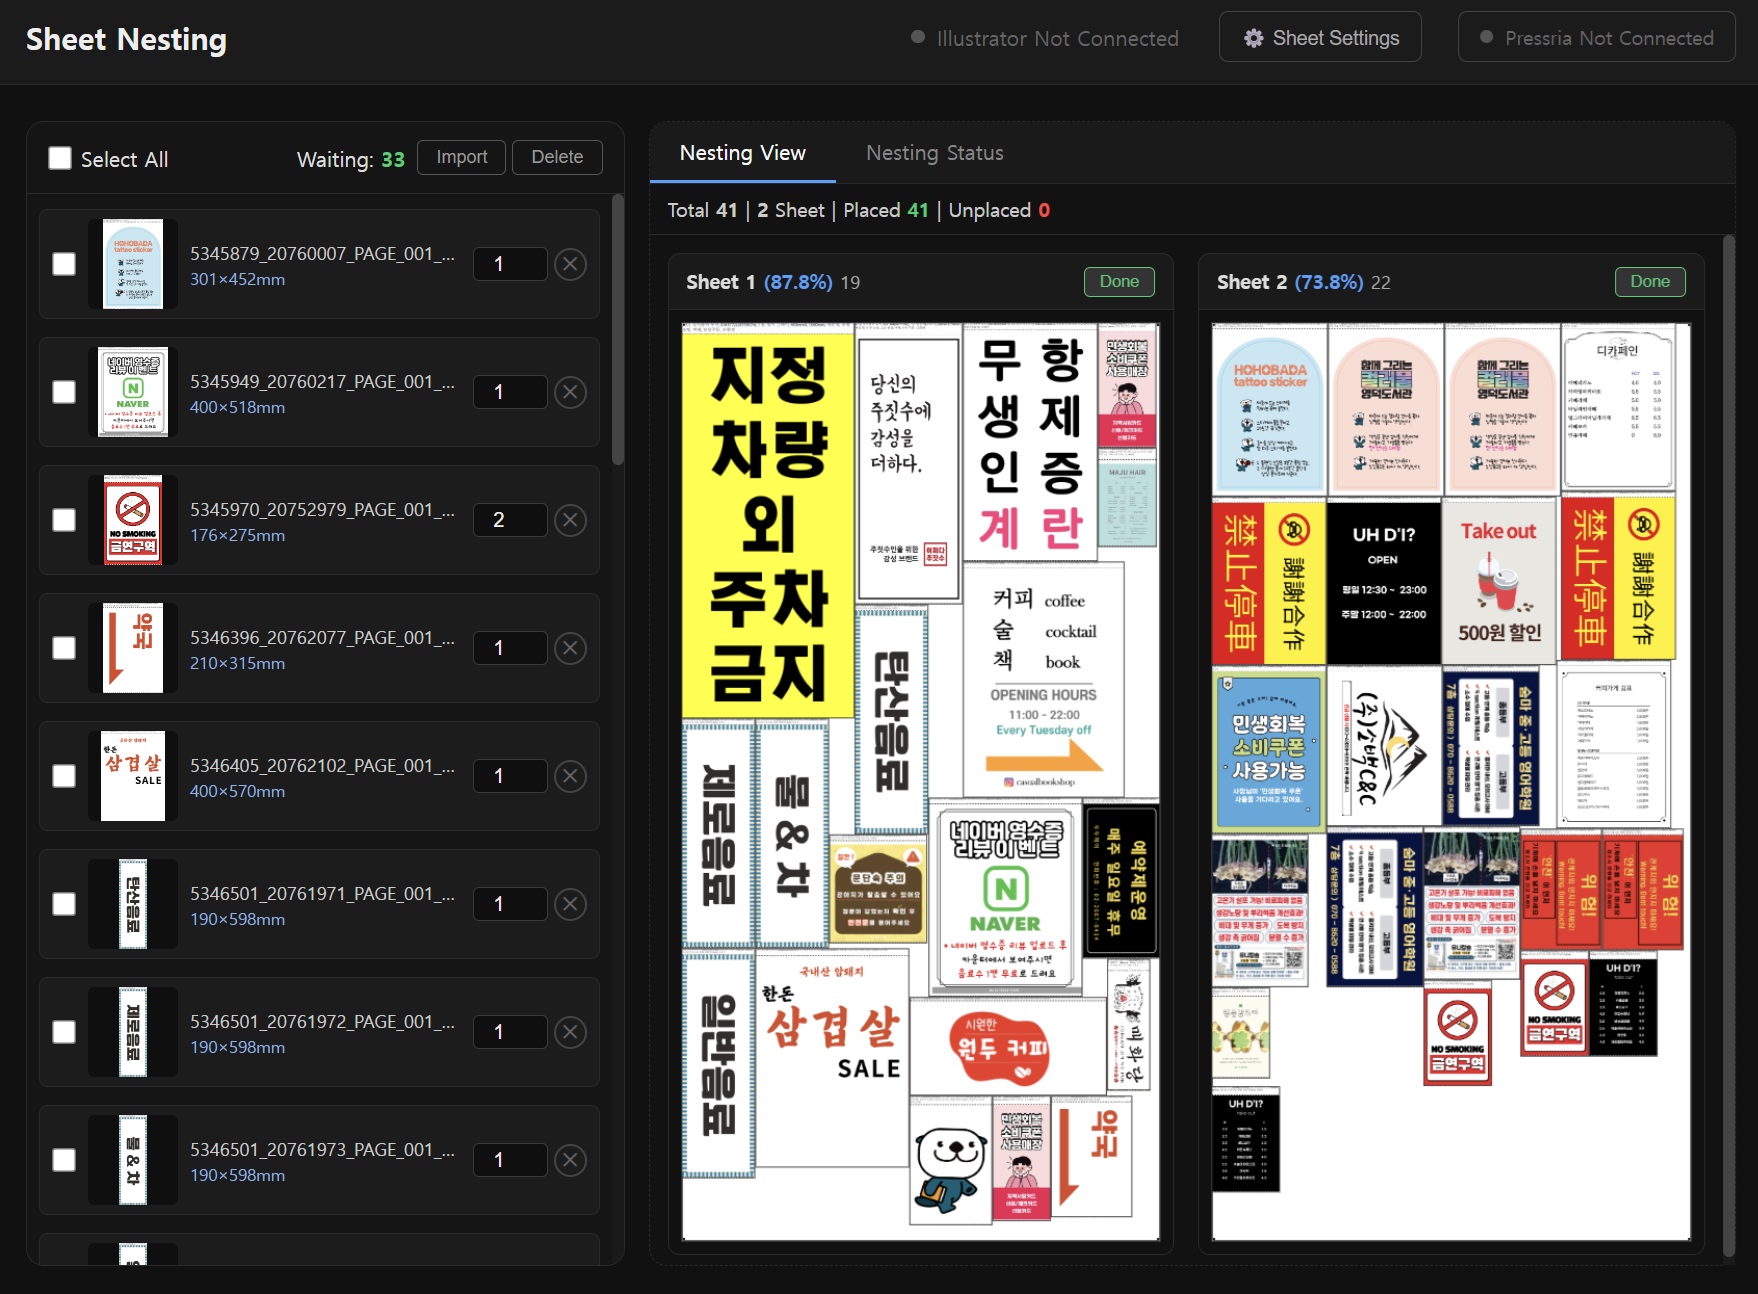
- 41 jobs — mixed flyers, menus, POS signs, notices, from many customers
- 2 sheets — Sheet 1 packed to 87.8% (19 items), Sheet 2 to 73.8% (22 items)
- 0 unplaced — every job placed, nothing left in the queue
- seconds — rectangular packing is near-instant, not the minutes true-shape needs
Sheet 2 sitting at 73.8% isn't the algorithm failing — it's the honest remainder. After Sheet 1 is packed tight, what's left has to go somewhere, and that's what you'd carry to a second run anyway. The point is that a human imposing these 41 mixed-size jobs by hand would spend 20–40 minutes, and would usually leave more waste on Sheet 1, because people stop optimizing once the obvious placements are done.
Where Sheet Nesting fits — and where it doesn't
Be clear about the boundary, because it decides whether this tool is for you.
It fits small-format, fixed-sheet gang printing: flyers, leaflets, menus, coupons, POS and in-store signage, parking/smoking notices, small rigid panels — anything where many rectangular jobs share one cut-down press sheet.
It does not (yet) fit large-format roll media — banners, vehicle wraps, long roll signage. Packing onto a continuous roll is a different problem from packing onto a fixed sheet, and shops doing that work usually already have a wide-format RIP that nests for them. Variable-length roll layout is a separate mode, not what Sheet Nesting is built for.
So if your daily pain is "too many small jobs, one sheet, done by hand," this is built for you. If it's "one giant banner on a 50-metre roll," it isn't — at least not today.
Why Sheet Nesting is free
Sheet Nesting in PB is free, and it's worth being straight about why rather than pretending it's generosity.
Rectangular gang imposition is a high-volume, everyday task, and it's the most common reason a shop would open a tool like this in the first place. Giving it away for free removes the friction of "should I bother installing this," and lets you put PB into your daily workflow with nothing to lose.
The parts of PB that are paid are the ones that handle irregular work and unattended automation: True Shape Nesting for die-cut shapes, automatic cut-line generation, background removal for sticker artwork, and the unattended hotfolder pipeline that runs without anyone clicking anything. If your work is rectangular gang printing, free Sheet Nesting may be all you ever need. If you move into stickers, keychains, or die-cut goods, the paid pipeline is there when you get there.
Caveats
Two honest limits:
- Rectangular packing won't reclaim irregular waste. If your jobs are actually irregular cut-outs, sheet nesting will treat their bounding boxes as rectangles and you'll leave gaps that True Shape Nesting would have filled. For rectangular print jobs this is a non-issue; for die-cut work, use the right mode.
- Bleed and spacing are your inputs. PB packs what you give it. Files prepared without bleed, or with inconsistent margins, will pack tightly but print badly. Garbage in, garbage out — the nesting step doesn't fix prepress hygiene.
The takeaway
Ganging up by hand is a tax most shops pay every single day without counting it. For rectangular jobs, that tax is avoidable: load the files, set quantities, let the sheet pack itself, and review it in Illustrator with registration marks already in place.
It's free for the rectangular case because that's the everyday case. And when your work grows into irregular, die-cut, automated territory, the rest of the pipeline is already sitting in the same tool.
Pressria Bridge is a Windows desktop application that automates print production workflows including sheet nesting, true-shape nesting, cut line generation, and Illustrator integration. Sheet Nesting is free; download at pb.pressria.com.